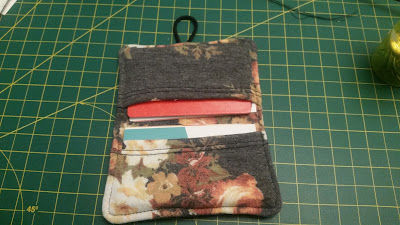
I've been sewing a lot of garments lately, which means I have a lot of smallish, oddly-shaped fabric scraps lying around. After scouring Pinterest for a simple, practical, scrap-busting project, I decided to try my hand at this photo-only tutorial from UsefulDIY.com. The lack of instructions might make things tricky for a new sewist, so I decided to share my version, with written steps.
What you'll need
- 2 small rectangles of fabric (approximately 3" by 5")
- 2 large rectangles of fabric (approximately 5" by 6")
- 1 button
- 1 piece of elastic cord (approximately 2.5") OR 1 hair elastic
- Thread
- Hand-sewing needle
- Optional - sewing machine
- Optional - iron
I used my sewing machine for this project, but it's small enough that it would still be very easy to do by hand. If you're new to sewing, check out this great guide on hand-stitching basics from Sew4Home.
Pressing folds and seams with your iron will make your project look neater and more professional, but it's not strictly necessary. Always make sure you're using the right temperature settings for your fabric. If you're not sure what your fabric is made of, start with low heat and work your way up until the fabric holds a crease.
Step 1
Take one small rectangle and fold one of the long edges under, about 1/2". Press with a hot iron to hold the fold, and topstitch to hem this edge. Repeat with the second small rectangle. These will form the pockets on the inside of your wallet.
Step 2
Matching the raw 5" edges, lay your pocket pieces on top of one of the larger rectangles with right sides (the patterned or nice sides) facing up. The hemmed edges will face each other, with about an inch of space in the middle.
Step 3
Lay your second large rectangle on top, with the right side facing down, so that your pocket pieces are sandwiched in between. Match all of the edges as best you can and pin 3 sides in place. Leave one of the short sides open for the next step.
Step 4
Place your elastic in the center of the short side that you left open. If using a hair elastic, pinch the center and place it so that it's about half in and half out of the fabric sandwich. If using a cut length of elastic cord, fold it in half and place the looped end inside your sandwich (between the fabric layers). Leave the tails sticking out and pin the last side in place.
Step 4
Sew around the edges of your sandwich, making sure to leave a gap in the end opposite your elastic. I used a seam allowance of 1/4". To get sharp, crisp corners on your wallet, clip the corners as shown in the ninth photo of the UsefulDIY.com tutorial.
I didn't clip the corners, so you'll see later that my corners have more of a rounded edge. If you want a really rounded edge, sew rounded corners instead of sharp ones and clip.
Step 5
Flip your sandwich right side out through the hole you left. Make sure to push corners and seam out. Fold the raw edges of the hole inside and press your seams so that the outer edges all lay flat and smooth.
Step 6
Topstitch about 1/8" from the edge around the outside of your wallet. This will close the gap and help keep all of the layers in place. Make sure you can fit your cards inside the pockets! Depending on whether or not your fabric has stretch and on how closely you followed the measurements described above, you may want to topstitch closer to or further from the edge.
Step 7
Fold your wallet shut and place your button so that the elastic loop can stretch over it easily, but tightly enough so that the wallet stays closed. Mark the spot and sew your button on, making sure to stitch only through the outside layer of fabric so that the stitches are hidden inside your pocket. If you sew through the pocket, you won't be able to get your cards in properly.
Voila! You're done and you now have a custom, one-of-a-kind wallet to store your cards.
- Sarah (Volunteer)
All images provided by Sarah


No comments:
Post a Comment