Tuesday, 30 April 2013

Tutorial DIY Paperclip Earrings


With Spring finally sticking around, it seemed like a good time this week to start my spring cleaning.  My first order of business was to address my colossally huge collection of jewellery and, after weeding out the broken earrings and pendants, I ended up with a pretty nice collection of beads and earring hooks that I could repurpose.  After doing a quick search on the web for ideas, and consulting a couple of crafty friends, I came up with a supremely easy plan for my repurposed jewellery items: paperclip earrings.


For this craft, you will need

Two earring hooks,
Two paperclips of the same size that you don't mind deforming,
Cotton or wool thread (and lots of it),
Reliable glue suitable for crafting,
Needle-nosed pliers (for the hooks), and
Scissors.
Optional: Colourful beads, and possibly a sewing needle.


This craft is very easy, and limited only by the colour of thread you may have at hand.  Fortunately, my mother used to cross-stitch when I was little, so I didn't have to go far for a huge selection of thread.  What I love about these earrings is that you can switch up the colour whenever you want, to match whatever you need.  Even better, they are really unique!  Here are the steps:

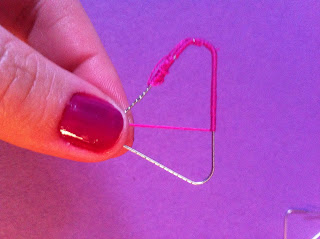
First, you need to straighten the edges of your paperclips to make a triangle.  It's best to have the overlapping edges overlap on top of each other instead of putting them side to side, as this will create a weird bump that will be noticeable from face-on.

Once the clips are shaped, you need to start attaching your thread to the wire.  What seemed to work for me was dabbing a bit of the glue to the clip, then pressing the thread to the glue to secure it.  And even then, I made a knot with the thread on top of the glue to make it extra, extra secure.  

(I should note here that the beads I wanted to use are the tiny little glass beads, so I split one strand of cross-stitch thread in half to be small enough to go through.  After securing one end to the clip, I pulled the loose end through a sewing needle for later on.)
Now that the thread is attached to the wire, you can start wrapping the thread around the paperclip.  I'll be honest, this takes FOREVER because you want to make sure you wrap it tight enough that the clip is well covered and won't show through. 

Keep wrapping until you've gone all the way around and you're back at the spot that you knotted and glued.  And then wrap over that!
Now, there are a couple of ways that I've seen these earrings done.  I'm personally a fan of the "dream-catcher" style.  To do this, you pretty much just run the thread across the paperclip frame in a haphazard manner, creating a spiderweb-like effect.  You can leave these webby threads bare, or you can dress them up with some beads (as I have done here).
  
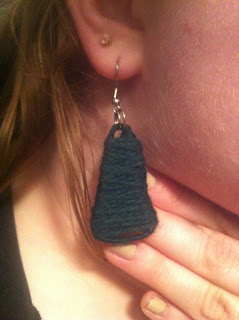
The other way I've seen these earrings done, is to wrap the thread across the whole frame until it is partially or completely covered, as you can see from these lovely specimens by a friend.  (I think she also used wool thread for these.)

Now that you've threaded and decorated your earrings to your taste, you need to secure the other end of the thread.  Since the wire is covered, you'll need to either glue the end of the thread to a spot that won't be noticed too well, or make some kind of knot (which is easy if you have a sewing needle at hand).
Finally, you need to attach your earring hooks to whichever spot you've decided is the top of your earrings, and use your needle-nosed pliers to make sure they're secure. And you're done! 
-Nichole (Volunteer)

Friday, 5 April 2013

Redecorating the Reuse Way

Spring is here and you know what that means; a new season of fashion is upon us! New colours, new styles, and a brand new "it" item for everything from clothes to shoes, bags, and yes, even home decor.

Luckily redecorating doesn't have to break the bank. The style and feel of a room or space can change in an instant just by altering a few key details, and that doesn't necessarily mean purchasing brand new items! With some supplies and a few simple tweaks, it is easy to transform and reinvent your space, time and time again.

Just to get you started, here are a few of our favourite ideas for creative redecorating.

-Want to add a pop of colour or texture to an otherwise neutral space? Or maybe you've got an old-fashioned lamp that you just know could be a great piece if only it wasn't so outdated. Why not try re-covering your lampshades with fabric? Adding trim to the edges of a plain lampshade is an even easier alternative, if you're a fan of more subtle details. Here's a great tutorial if you aren't quite sure where to begin. This blogger takes a plain white shade and transforms it with a simple, printed cotton.

-This is an oldie but a goodie and one that a lot of people don't think of, but if you're rocking a hand me down couch of dubious style, why not try a slipcover to hide that floral velvet or pilling fabric? If your furniture is hard to fit, buy a length of upholstery fabric; with some clever draping and a few tucks, you've got a brand new look!

-Adding throw pillows are a classy (and comfortable!) way to change the look of a room. When yours become outdated, simply re-cover them! Sewing a pillow cover is a quick and easy project, even for beginners, and can be done by hand if you don't own a sewing machine! And here's an even simpler, no-sew tutorial.

Here's an insider tip from one of our customers that makes this project even easier: upholstery fabric samples make great pillow coverings! They are pre-cut and made of durable fabric that will stand up to a lot of abuse. Using a different, but coordinating, fabric for each side of the pillow gives you even more day-to-day decor options.

-Paint or stain your wooden furniture to make it modern! Or change the hardware on a beloved piece to update it. This is a great tip because hardware changes are completely reversible and there is little risk of damaging the furniture itself.

-Personalize just about anything with homemade tile mosaics! Here at the Reuse Centre we're always getting samples of different kinds of tile in various colours, patterns, and textures that are just perfect for small to medium projects. The Joy of Shards is an amazing resource for mosaic making, complete with ideas and tutorials.
 Tile mosaics aren't just for tables or flat surfaces either. Try covering plant pots, jewelry boxes, picture frames, or even make a large piece of art for the wall!

-Move those knick-knacks! This is the cheapest, easiest trick of all, but if you're anything like me, you get stuck in the habit of "where things go." Maybe that lamp would look better in the bedroom, and perhaps that vase complements your bathroom better than it does the kitchen. Pretend you're moving in all over again, and mix things up!

These are just a few of many ideas for incorporating reuse into your redecorating. What are some of your favourites? Please share in the comments section!


-Sarah (Volunteer)