Wednesday, 26 July 2017

Disposables to Ditch From Your Beauty Routine

Back in April, I shared a post on 10 Disposables to Toss From Your Kitchen. As I was writing it, I got to thinking about all of the different disposable products in my home. Today, I'm sharing 6 disposables you can ditch from your beauty routine.

Disposable Razors
Disposable razors are big chunks of plastic that we throw away every month or so, even though only the blade is dull. If you want a smooth shave with hardly any waste, consider a safety razor. They cost more at the outset, but will save you a lot of money over time. 

If you're not ready to take that step, trade in your disposable razors for a sturdier model with replaceable blade cartridges. These produce far less waste than fully disposable models.

Facial Cleansing Wipes
Get back to basics with a facecloth and your cleanser of choice. Disposable wipes end up in the landfill, and so-called "flushable" wipes are also pretty bad for sewers, septic systems and waterways.

Ditch the makeup remover wipes by embracing the humble facecloth. Just pair it with your makeup remover of choice (in a recyclable bottle) or to reduce your waste even further, try making your own at home. Worried about mascara stains? Buy dark colours! 

Some companies even make reusable makeup remover cloths out of microfiber that claim to clean with just water.

Cotton Balls and Cotton Pads
Okay, so you might want to keep some of these around in your first aid kit, but our good friend the facecloth can do pretty much everything that a cotton ball can do, from removing makeup to applying toner. A dry facecloth corner can even help you get the perfect amount of smudge in your smokey eyeshadow.

For trickier jobs like taking off nail polish, try using a soft rag with your favourite remover.

Makeup Applicators
A decent set of makeup brushes will last you for years. They're washable and reusable, and generally give you more control over your eyeshadow than those cheap foam-and-plastic wands. Once you've got your brush, make an effort to buy brands that don't include the applicators to avoid that waste.

If the thought of trading in your concealer sponge for a brush gives you heart palpitations, remember that sponges are washable too! Even if they seem like they are meant to be single-use, you can wash and reuse them many times.

Cotton Swabs
Whether you are using them for cleaning or applying makeup, all those disposable cotton swabs are adding waste to the environment. Instead, use a reusable alternative, such as an eyeshadow brush to apply your makeup while reducing waste.

Face Masks
Single-use, individually-packaged face mask sheets seem to be the latest beauty trend. Aside from being kind of creepy looking, they're super wasteful! Next time your skin needs a boost, reach for a clay or cream mask that comes in a recyclable or reusable container, or try an easy DIY home recipe


What disposables have you ditched from your morning or before-bed routine? Share your ideas in the comments!

-Sarah (Volunteer)

Wednesday, 19 July 2017

Reuse Centre's 10th Anniversary Celebration!

We Turned 10!

“The fact that we are standing here today, 10 years later, accepting more donations, serving more customers, expanding our partnerships, growing our volunteer base and offering educational programming is a testament to the idea that Edmonton residents are eager to drive the concept of reuse in a direction that is unique and desired.”
- Kristen Arnot,  Reuse Centre Operations Coordinator 

Edmontonians flocked to the Reuse Centre on July 8, 2017 to help celebrate its big 1-0. With over 250 in attendance, guests were invited to participate in family friendly activities and enjoy an assortment of treats that celebrated the Reuse Centre and Edmonton’s reuse community.

Scavenger Hunt

Guests were encouraged to explore, discover and learn about the Reuse Centre and what role the Reuse Centre plays in making Edmonton a waste conscious city. To complete the scavenger hunt, guests found clues by participating in activities, making it a fun filled, interactive experience!

“I really enjoyed volunteering at the Reuse Centre, especially for the wonderful occasion of its 10th birthday. I loved talking to people and was really amazed to see so many people interested in donating and buying the reusable items... I would definitely love to volunteer at the Reuse Centre more in the future.”
- Monisha, Master Composter Recycler 

Crafting 

Children and adults were invited to drop-in and upcycle Reuse Centre items such as straws, ribbon, yarn, pop tabs and more to make DIY Whimsical Wands to twirl in celebration. Creativity and imagination soared and glittered to new heights!

Worm Wiggling Fun

Master Composter Recyclers and their red wiggler friends made an appearance to educate guests on composting at home and offered compost tea bags for guests to take home.

20170708_145120.jpg
Master Composter Recyclers
Photo Credit: City of Edmonton

“Rebecca and I talked to over 70 people about composting, recycling and worms. One lady came up to us asking if we knew anyone who wanted worms and at the same time another lady came up asking if we knew where she could get worms. To say the least we immediately introduced them to each other and let them work out the details...All round a very good day!”
- Carolyn, Master Composter Recycler Volunteer

Facility Tours

Volunteers offered tours every 30 minutes for those who wanted to learn more about the behind the scenes of the Reuse Centre. Guests were able to check out the drop-off area, sorting room, storefront and workshop room, while learning the history and fun facts of the Reuse Centre.

Photo Booth

Guests used the hashtag #reusecentre as they snapped photos at the photo booth made entirely out of reuse material.

R E U S E  C E N T R E  Art Piece

Glue guns were hot as guests collaborated on a reuse art piece to be displayed in the store. Each guest made their mark by glue gunning a few reused materials to the art piece.

20170708_145329.jpg
‘E’ from R E U S E  C E N T R E Art Piece
Photo Credit: City of Edmonton

“Thank you very much for this opportunity. I was in charge of decorating the letters with donated items, such as pieces of puzzles, crayons and yarn. It was my first time in my life to see and use a glue gun - wonderful! The children may have enjoyed the crafting, but I might have enjoyed it the most.”
- Yoshie, Master Composter Recycler Volunteer

Treats!

Popcorn, cupcakes and a reuse themed cake were distributed to guests to keep their energy high during the event. Plus, let’s be serious: it’s not celebration without cake!

20170708_145857.jpg
Volunteer handing out cupcakes
Photo Credit: City of Edmonton

20170708_090124.jpg
Reuse Centre themed Cake
Photo Credit: City of Edmonton

All in all, the 10th Anniversary Celebration was a success! It brought the community together and showcased the current, and still growing, passion for reuse that runs through the hearts of Edmontonians. Here’s to another 10 years!


Thursday, 6 July 2017

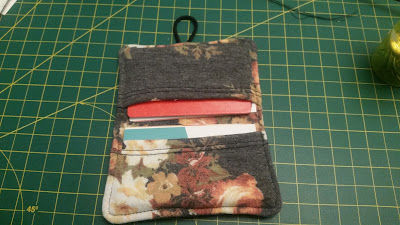
DIY Fabric Scrap Wallet

I've been sewing a lot of garments lately, which means I have a lot of smallish, oddly-shaped fabric scraps lying around. After scouring Pinterest for a simple, practical, scrap-busting project, I decided to try my hand at this photo-only tutorial from UsefulDIY.com. The lack of instructions might make things tricky for a new sewist, so I decided to share my version, with written steps.

What you'll need
  • 2 small rectangles of fabric (approximately 3" by 5")
  • 2 large rectangles of fabric (approximately 5" by 6")
  • 1 button
  • 1 piece of elastic cord (approximately 2.5") OR 1 hair elastic
  • Thread
  • Hand-sewing needle
  • Optional - sewing machine
  • Optional - iron 
I used my sewing machine for this project, but it's small enough that it would still be very easy to do by hand. If you're new to sewing, check out this great guide on hand-stitching basics from Sew4Home.

Pressing folds and seams with your iron will make your project look neater and more professional, but it's not strictly necessary. Always make sure you're using the right temperature settings for your fabric. If you're not sure what your fabric is made of, start with low heat and work your way up until the fabric holds a crease.


Step 1
Take one small rectangle and fold one of the long edges under, about 1/2". Press with a hot iron to hold the fold, and topstitch to hem this edge. Repeat with the second small rectangle. These will form the pockets on the inside of your wallet.


Step 2
Matching the raw 5" edges, lay your pocket pieces on top of one of the larger rectangles with right sides (the patterned or nice sides) facing up. The hemmed edges will face each other, with about an inch of space in the middle.


Step 3
Lay your second large rectangle on top, with the right side facing down, so that your pocket pieces are sandwiched in between. Match all of the edges as best you can and pin 3 sides in place. Leave one of the short sides open for the next step.


Step 4
Place your elastic in the center of the short side that you left open. If using a hair elastic, pinch the center and place it so that it's about half in and half out of the fabric sandwich. If using a cut length of elastic cord, fold it in half and place the looped end inside your sandwich (between the fabric layers). Leave the tails sticking out and pin the last side in place.


Step 4
Sew around the edges of your sandwich, making sure to leave a gap in the end opposite your elastic. I used a seam allowance of 1/4". To get sharp, crisp corners on your wallet, clip the corners as shown in the ninth photo of the UsefulDIY.com tutorial. 

I didn't clip the corners, so you'll see later that my corners have more of a rounded edge. If you want a really rounded edge, sew rounded corners instead of sharp ones and clip.


Step 5
Flip your sandwich right side out through the hole you left. Make sure to push corners and seam out. Fold the raw edges of the hole inside and press your seams so that the outer edges all lay flat and smooth.


Step 6
Topstitch about 1/8" from the edge around the outside of your wallet. This will close the gap and help keep all of the layers in place. Make sure you can fit your cards inside the pockets! Depending on whether or not your fabric has stretch and on how closely you followed the measurements described above, you may want to topstitch closer to or further from the edge.


Step 7
Fold your wallet shut and place your button so that the elastic loop can stretch over it easily, but tightly enough so that the wallet stays closed. Mark the spot and sew your button on, making sure to stitch only through the outside layer of fabric so that the stitches are hidden inside your pocket. If you sew through the pocket, you won't be able to get your cards in properly. 

Voila! You're done and you now have a custom, one-of-a-kind wallet to store your cards.

- Sarah (Volunteer)
All images provided by Sarah