Friday, 18 December 2015

Anything but Christmas Trees

Reuse-friendly Alternatives for a Different Kind of Christmas Tree

'Tis the season for retail marketing to challenge the concept of the traditional evergreen conifer tree. Why must they have all the fun?  Let's do our own mind exercise, and let's rethink and tinker.

In all its essence, the Christmas Tree is roughly triangular, conical, or pyramid shaped and it is meant to bring joy and cheer.  Simple!  This leaves so much opportunity to stretch our creative muscles and make our own beautiful, personal 'tree'.  Not everyone has the space or budget for a large tree, so this is also a nice reminder that there will always be a way to celebrate.

Before we run too wild, there are some key things to note. SAFETY FIRST!  Please make sure bulbs, lights and wires are not frayed and are rated for indoor use.  When designing your new festive tree, please consider fire hazards, weight distribution, load considerations, and the unpredictability/predictability of pets and kids.

You don't necessarily need to buy brand new supplies, but instead you can pull things from around the house to create a festive look and then return them back to their shelves after the holidays.  Consider giving some home staples a second purpose, rather than hiding your decorations away in a box for the rest of the year.  The Reuse Centre also has lots great supplies you could use.

Here are a few ideas I've come across:

- Siao (Volunteer)

Friday, 11 December 2015

Reuse Wreath Making Party

A few times a year, our volunteer blog team gets together for a reuse craft night. We've made Easter bonnets, glitter houses, and our awesome We Love YEG sign, originally made for the Green Window City project.

On a chilly evening in late November, we decided to tackle wreaths! First, we grabbed a pile of holiday decorations, garland, ribbon, wreaths, and wreath forms to use. Then, we took a snack break while we waited for the glue guns to heat up!

Part of our wreath-making stash. 
We had pre-made artificial wreaths on hand that we could have decorated, but everyone decided to start from scratch. Some of us jumped in, while others were a little overwhelmed by the possibilities! Nichole hit Pinterest, her favourite craft muse, for some inspiration. Lana tried to choose between the two ideas she'd thought up beforehand.

Soon, even the hesitant among us were off and running! We spent the next two hours crafting, chatting, snacking, and listening to alt rock music because Sarah couldn't find the holiday radio station.

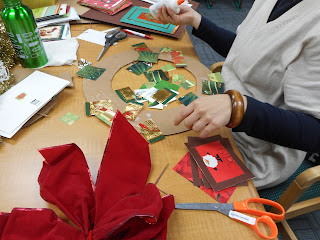
Lana came armed with a great idea to reuse old holiday cards.
If there is anything we've learned through the Reuse Centre, it's that paper towel rolls can be used to make ANYTHING! We were all eager to see what Nichole had up her sleeve.
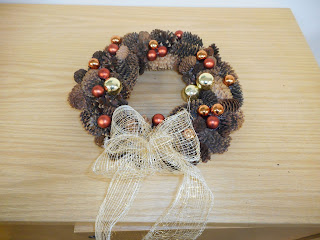
Sarah began gluing pine cones to a styrofoam circle. After poking herself several times with her spiny material choice, she had a respectable wreath!
Tamara wielded her glue gun like a pro, to secure this string of classic wooden beads.
 With the variety of materials at our disposal, the possibilities really were endless. We all chose really different items and wreath styles, and ended up with 4 unique creations.

Nichole made this minimalist beauty out of paper towel rolls! She cut them up and glued them into 5-pointed flower shapes, then glued all of her flowers together to make a circle. To add a festive touch, she glued on some sprigs of fake red berries.

Sarah finished off her rustic wreath by adding some small ornaments and a bow made from netting.

Tamara made this glittery treasure out of two skinny, willow-twig wreath forms. She tied them together to create a fuller base, and wrapped it with wooden beads and garland. Then she decorated it with bows, fake poinsettias, and gold ornaments.

Lana made this fun, colourful wreath out of old holiday cards! She cut a variety of cards into small squares, and glued them to a large cardboard circle she'd made. The three "photo" frames are made from card stock. They each contain a pretty picture from a card, but the tops are open so the images can be easily changed to other cards, or to family photos.

We can't believe how awesome these turned out, and how easy they all were to make! These projects are just a small sampling of what's possible with some old holiday items and a little creativity. Take a look around your house, and see what you can come up with!

- Sarah (Staff)

-All photos taken by Reuse Centre Staff

Tuesday, 1 December 2015

Pinterest 101

Pinterest is a well known social media platform that can be used by anybody. You may be an artist trying to showcase your work or looking for new ideas on how to build a business empire. You may be a hobbyist or artist in search of new project ideas or solutions.

Pinterest is mentioned often on this blog. It's a great resource for finding creative reuse ideas, but it can be intimidating for those who've never used it.

Welcome to Pinterest 101!


I should warn you, you may become addicted instantly!

I think of Pinterest like a giant scrapbook that allows me to keep all the ideas, recipes, and DIYs that I want to do in the future, in one place. This virtual scrapbook is easily organized so that with just a few clicks, I can find what I was looking at months ago. 

Pinterest is different from your regular internet bookmarks bar, because it allows you to attach photos and descriptions for quick reference. It is also shared on the internet, so you can see what other people have saved as well.

Did you know that the City of Edmonton is on Pinterest? There's even a Reuse Centre ideas board.


Setting Up Your Account


Your home feed will look something like this.
After you have signed up for an account, you will see a couple of things on the home page. There is a search bar at the top, your profile name to the top right, and tons of 'pins' below. This is called your 'home feed'.


In the top right, beside your name, you will see 2 thumb tacks that are a mirror image inside a grey icon. Click on that and you will find 3 tabs:

Find this icon on the far right, at the top of your page.
News is an update of what the people you follow pin, follow or like.

You updates you if people pinned or liked your pin. 

Messages is where you can view messages and pins that are sent to you from Pinterest friends and followers.


Building Your Pin Collection


Pins are typically made up of an image, captioned with text and linked to a website. The more boards you follow, the more pins will show up on your home feed.

A pin from the Reuse Centre board.
Sometimes you will see pins on your feed that Pinterest picked for you. Pinterest recommends other pins for you to view, based on the types of boards you follow, and the things you pin. You can also use the search bar to find pins related to a particular project or idea.

Clicking the Pinterest logo on the left will refresh your home feed. Clicking the button showing 3 horizontal bars
(on the right of the search bar) will open up a list of popular search options.

You can do 3 things when you hover on top of a pin with your mouse cursor.

1) Pin it. You can pin a pin on any board you have created. Title your boards to help you stay organized by topic. You might want separate boards for art, fashion, holidays or fitness.

2) Like it. You can 'like' by clicking the heart button, before you pin. This is especially handy if you don't have a suitable board to put it on yet, or maybe you didn't have time to fully read the pin. Sometimes the image can be deceiving and the pin's content doesn't match what you expected to see.

Here's a tip: I recommend not pinning everything you see that you kind of like! I often catch myself on Pinterest showing an interest in everything, and I just want to keep all this information forever without hesitation! Being selective with what I actually pin helps me to know that I saved a post with relevant and proper information.

3) Send it. You can share interesting pins with your friends who are on Pinterest, or send an email to those who aren't.

Staying Organized


Boards are where your pins are organized. Pretty simple and realistic! It's just like a virtual bulletin board.

You have the option to create both regular and secret boards. Regular boards can be seen and followed by anyone. Secret boards can be seen only by you and friends you have authorized. You cannot change this preference later on. Once a secret board, always a secret board.

After you title a board, you have the option to give it a description, give it a cover photo/pin (large image on board), categorize the board for others to search it, and even to allow other followers to collaborate with you on the board. This option is great for people who are working on a project together.

View your boards, or create new ones, by clicking on your name at the top right of your screen.

This is a basic tutorial, but you can reference help.pinterest.com for any questions you may have. You can even search for Pinterest tips and tricks in the Pinterest search bar. It sounds silly, but can be really useful!

I use Pinterest to organize ideas from other reusers from all over the world. I have a do-it-yourself (DIY) board, a home inspiration board, and a things to try board. I find myself looking over these ideas all the time and trying them when I feel inspired!

Enjoy Pinterest and all that it has to offer!


- Michelle (Volunteer)
with additional information and edits by staff

Screencaptures of Pinterest.com taken by Michelle and Reuse Centre staff