Showing posts with label DIY. Show all posts

Thursday, 2 July 2020

The Power is Yours!

I've never been a big fan of practices that are considered wasteful or that may be harmful to the environment.  Maybe that's because I grew up watching Captain Planet guard the earth and The Raccoons protect the forest.  I was taught to be aware of pollution and to be a good global citizen by putting litter in its place. 
Graphic by Charlene

As a kid, I was lucky enough to participate in programs and initiatives that supported the environment.  I took school field trips to logging sites, where we helped forestry services with tree planting.  I still remember how exhilarating it felt to physically place those tiny, baby trees in their new earthy homes.  I thoroughly enjoyed the fresh air, exercise, and the opportunity to make a difference.   

Since the invention of the internet, it has become exponentially easier to learn about and discuss our impact on this earth.  Knowledge is being shared across the globe every day.  While this has certainly been helpful, it's also made it clear that there's so much more work to be done. 

Graphic by Charlene

There are many simple and accessible changes that I’ve made to lessen my impact on our planet.  When I learn a new way to complete an everyday task that presents an environmentally-friendly alternative to the norm, I try to adjust my lifestyle.  I'd like to share a few practices that I've adopted.


Low-Impact Dusting


Let’s face it, dust bunnies are everywhere!  They congregate in corners and hide behind doors.  If you’re not careful, they invite all their friends and family over for a party.  My house regularly hosts conventions for a small army of the biggest dust bunnies known to man*.
*not scientifically proven

I’ve found vacuuming tends to leave a trace amount of dust behind, that's particularly noticeable on hard surfaces.  So I utilize a few tools that don’t produce the waste involved with disposable dusting products:
  • reusable container
  • cloth that’s not too fancy
  • small amount of tap water
For the container, I typically rinse and reuse a small plastic butter/margarine tub, but you could use the dish or bucket of your choice.  If you don't have the right container at home, the Reuse Centre carries an assortment of types and sizes, based on donations.  Reusable cloths are widely available, and there are many DIY options too.  For example, old holey t-shirts can be cut up into small squares, or you may already have a selection of dishcloths ready for retirement.  Face towels are good options too.  If you choose a reusable cloth, the impact can be further minimized by removing/rinsing as much dirt or grime as you can using your water bin, then tossing the cloth into a wash cycle with other clothes.  When I'm done dusting, I "donate" the dirty water to my compost farm!


Cardboard Creativity


I prefer cardboard to plastic, but end up with a lot of it at home!  I've begun shredding smaller packages and spreading them in my compost farm.  For those without compost worms, cardboard containers make great reuse!  Think... wrapping for presents, packaging for parcels, even everyday organization around the house.  Use cardboard to separate drawer contents and keep small objects contained.  Cardboard boxes are also great if you plan to move!


Have you discovered a great way to reduce, reuse and save?  


Please leave us a comment and share your ideas for supporting the environment!


Submission and artwork by Charlene (Volunteer)

Tuesday, 11 September 2018

5 Tips and Tricks Before You Thrift

Are you tired of your style? Would you prefer a more sustainable way to shop? Are your funds limited? If you answered yes to any or all of these questions, you're in luck! Thrift shopping is the answer to your fashion dilemma! However, before you go rushing to the nearest thrift store, here are five tips and tricks to guide you through thrift shopping.


                                                         Photo: Cindy Caturao


1. Set a Budget

Limit your spending! With prices reduced to almost half, sometimes even three quarters of the original price, it's quite easy to get carried away and buy clothes and furniture that you don't necessarily need. Ask yourself: Do I need it? Will I actually use it? Is it worth it? Setting a budget will help you to not only narrow down the things that you need but also keep your spending in check. 

2. Shop Around 

Edmonton offers a variety of consignment boutiques, thrift shops, and many second-hand stores. Various neighborhoods will also carry different items. I suggest going to multiple locations for an eclectic mix to shop from.

3. Sign up for memberships 

I understand, there is nothing more annoying than constantly receiving promotions, newsletters and just overall spam mail from different companies but sometimes it's worth it to subscribe. Occasionally, places such as Goodwill and Value Village will email members 40-50% off coupons. 

4. Shop with an open mind

Refrain from sticking to one area of the store. The beauty of thrift shopping is that most of the time, the items that you find are from the most unexpected sections of the store. Keep your options and selections ample and explore different areas of the store outside of your comfort zone!

5. D.I.Y.

Occasionally, you may find a garment that's not your ideal size or style. Making some quick and easy alterations allows you to see beyond the original purpose of the item. It opens up the potential and possibilities to reuse and repurpose garments. 

Thrift shopping is a sustainable way to dress without breaking the bank. It promotes reusing and repurposing garments that might otherwise end up in landfill creating more waste. Lessen your carbon footprint and shop at a thrift store. You never know what you might find!


                                                                                       - Cindy (Volunteer)

Tuesday, 25 October 2016

October Reuse-It Item - Favourite DIY Halloween Decorations

With Halloween just under a week away, we thought that it's only fitting for this month's Reuse-it item to be our favourite DIY Halloween decorations. 

These DIY projects are easy to make and are great for all ages. Check out our favourite ideas and try some of these on your own, or with friends and family!

Vanessa


Pine cone bats are simple to make and are a great way to use up pine cones laying around your yard before winter starts. All you need is some felt, glue, paper, and googly eyes. Instructions can be found at Fireflies + Mud Pies.


Creating a monster door is a fun way to add lots of character to the exterior of your house, when you're short on time or have limited supplies. These doors use coloured paper, paper plates, tape, and party streamers. Find out more details on how to create a monster door at GoodtoKnow.


Sarah

These DIY jar lanterns from Adventure in a Box are gorgeous, and you don't need to be a great artist to make them! Crafters have the option of making their own designs, or using the printable ones from the website. This is a great all-ages craft that looks classy!


Tamara & Lana

Ghost jugs are a simple Halloween decoration that both adults and kids can create. Grab a few 4L empty milk jugs, draw faces on them using permanent markers, and then cut a hole in the back to insert a light. You can find the tutorial at eighteen 25.

A fun variation of this project is to print large letters on each jug to spell out a message or spooky phrase. Another alternative is to add a bit of colour by using coloured permanent markers or a string of coloured lights.


What's your favourite DIY Halloween decoration? Share your favourites in the comments section. Happy crafting!

Friday, 14 October 2016

Goblins and Ghosts and Picture Frames, Oh My!

I love the idea of holiday decorating, but I don't have a pinterest-perfect home. Cute knickknacks on tables and ornaments on shelves tend to get shoved aside in favour of functionality.

This is why I've decided to focus on seasonal decorating with picture frames! My walls are never littered with the empty coffee mugs, books, and cat toys that seem to plague all of the horizontal surfaces in my apartment. 

There are so many ways to use picture frames in your decor. Here are a few of my favourites for Halloween!

Halloween Floating Frames

I love how simple and easy these are! Any frame would be great for this project, with the help of a little bit of paint. The best part is that they'd be really easy to repaint and switch out with each season. 

This tutorial from g*rated uses window clings, but if you have frames that could take two pieces of glass, you could easily design and cut out your own shapes from black or patterned paper. 


DIY Ghost Face Picture Frames

These spooky ghost faces would be perfect for a Halloween party or haunted house! They're a bit more complicated than the window-cling frames above, but this turorial from eHow actually looks pretty easy. 


Boo Frames

These cute frames are easy to make, and a great way to use up bits and pieces of scrapbook or wrapping paper! See the tutorial at A Diamond in the Stuff.


DIY Framed Spiderwebs

Low on time and decorating energy? These quick, easy spiderwebs can be made in a frame of any shape, size, or colour. The tutorial from Twelve on Main uses wooden frames and a staple gun to attach the yarn, but hot glue (or regular glue and a bit of patience) would also do the trick on a metal or plastic frame. 


Halloween Wreath

I love the detail of this funky Halloween picture frame wreath from My Humble Home and Garden. With a little bit of hunting for the right materials, it would be very easy to create something similar.

If you like the idea, but want something with a bit more of a seasonal autumn theme, there are also lots of great picture frame wreath tutorials online!


-Sarah (Volunteer)

Thursday, 21 July 2016

New Programs at the Reuse Centre!

Have you heard the exciting news?

The Reuse Centre is now offering group programs and birthday party programs. These offer a wonderful opportunity to learn more about how to reduce everyday waste through reusing, upcycling, DIY ideas, scavenger hunts, and eco-challenges. Each program includes a complimentary Reuse Centre Shopping Experience where your group can pick up items for future crafting.

Photo Credit: City of Edmonton

What Group Programs are Available?

Group Programs are an excellent option for community groups such as daycares, Girl Guides or Scouts, sports associations, seniors’ groups, youth groups, schools, or any other interested social group. Programs must be booked at least 3 weeks in advance and are available year round.

We offer 1.5 hour or 2 hour program options, and each program can accommodate up to 30 individuals. You can choose from the following themes:

DIY Kids | 6 - 11 yrs
DIY Youth & Adult | 12 yrs and up
Green City Challenge | 6 yrs and up

Why not brush up your upcycling skills and book a program today? Also, stay tuned for more information as we will be offering a few pre-registered workshops in the Fall.

Photo credit: City of Edmonton

What Birthday Party Programs are Available?


Want to celebrate your child's birthday at the Reuse Centre? Birthday Party Programs are available for ages 6 - 14 years. Go on a reuse crafting adventure or put on your detective hat to solve a waste mystery.

Birthday Party Programs are 2.5 hours in length which includes a 1.5 hour program and a 1 hour room rental for cake and presents. You can choose from the following themes:

Crafty Kids | 6-14 yrs
Reuse Detectives | 6-14 yrs

Book now to celebrate your child's birthday with us!


Photo credit: City of Edmonton


Did You Know We Also Offer Boardroom Rentals?

Need a place to host your next meeting, workshop, or small social gathering? The Reuse Centre’s boardroom offers an affordable, flexible space, and amenities to meet your needs, with space for up to 30 people. Discounts are available for non-profit organizations.

Booking Information
For more information, or to book a program or rental, visit our website
CALL 780-944-7424
EMAIL reusecentrebookings@edmonton.ca

Friday, 6 May 2016

May Reuse-It Item - VHS Tapes

May's Reuse-It Item is VHS tapes! We get a lot of them here at the Reuse Centre, and so many of our customers tell us that they'll be bringing their old VCRs out of retirement, after finding some of their favourite classics in the store.


Image source: Reuse Centre staff

With the advent of DVDs, Blu-Ray DVDs, and streaming services, many of us have old or unusable VHS tape collections. If you don't plan on watching them, what do you do with all of those old tapes? Our blogger team has taken up the challenge! We've pulled together a few of our favourite VHS upcycling ideas from around the web.

Siao

I am constantly running out of storage containers and space. Plastic VHS cases are great for organizing smaller items, and it's super easy to stack them onto a shelf. Make a small label for the spine of the case and you are set!  If the black cover bores you, you can have a small craft session with the kids to decorate the exterior.

Tamara

In this age of technology where new gadgets and systems are produced almost constantly, there's a high likelihood that you have some old VHS tapes that have become dust collectors. There's a number of things you can do with them so they don't just end up in the garbage. Take, for instance, this easy to make pen holder:
You only need 4 tapes, glue, and some sturdy cardboard. In fact, I wouldn't think you have to limit yourself to making just a pen holder with this idea! This container could also be used to store kitchen utensils (spatulas, wooden spoons, and the like), fake flowers, and probably a lot more. Put your creative hat on! 

Get the full instructions at Hipcycle.

Vanessa

A VHS coffee table would make a great addition to a family or rec room! It’s super easy to make, and is sure to be a conversation piece. Add a touch of nostalgia by using your favorite movies!

Get the tutorial at Instructables.

Sarah

I love this VHS tape pencil case idea! You could also use these for sorting and storing craft supplies, like buttons or bobbins of thread. Get the tutorial at Taylor Rae Luster Flights of Fancy.

Do you have a collection of old VHS tapes? Blow the dust off, and get creative! Share your ideas in the comments below!

Please note that the Reuse Centre only accepts commercially recorded VHS tapes, and blank tapes still in the packaging. Home recorded VHS tapes should be disposed in the garbage.

Thursday, 10 March 2016

Post-Holiday Tissue Paper Crafting

Now that the holiday season is behind us, here is one way to minimize the household waste from everyone's favourite part of the holidays — the gift giving!

Tissue paper is a lovely addition to any present, but has few uses after everything has been unwrapped. One reuse idea is to use it for a lovely family arts and crafts session! All you need are scissors and glue, some warm water, a cup, your leftover tissue paper, a sheet of wax paper, and a paintbrush or sponge to make amazing artwork.

Directions

1. Cut your wax paper a little larger than you'd like your tissue paper art to be.
2. Dissolve the glue in warm water (I find that a ratio of 1:2 works well) in your cup.
3. Cut up your tissue paper into small pieces, to be glued onto the wax paper (squares or rectangles are a good shape to start with).
4. Sponge some glue mixture onto the wax paper in the area that you'd like to start placing your tissue paper.
5. Place tissue paper pieces onto the glue spots in the arrangement you'd like. Feel free to layer!
6. Pat down the tissue paper with your sponge, and make sure that you soak them through with the mixture.
7. Leave your art to dry.


8. Trim the wax paper edges down to the size that you want.


9. VOILA! Take a step back and look at your beautiful art piece! You can frame it, or place it somewhere that it will have light shining through, for a stained-glass look.


For an extra "Wow" factor, you can cut out some aluminum foil for a focal point, or add some glitter while the glue is still drying.

Happy crafting!

-Mallory (Volunteer)

All photos provided by Mallory

Monday, 29 February 2016

February Reuse-It Item: Pine Cones

Think it's time to put the pine cones away, now that the holidays are over and Spring is fast approaching?

Think again!

This month, our blogger team has put together a list of clever ideas to use pine cones, all year round.

Michelle

I typically use pine cones for crafts and decor. It's important to me to clean out the dirt and possible bugs that may be stuck in the crevices of the scales. Check out this straightforward tutorial from Urban Jane to learn how to clean out pine cones, so you don’t have to buy them from a craft store.


Sarah

Give your feathered friends a treat, and lure wildlife to your yard with this awesome, all-natural bird feeder made from a pine cone! This is a simple, quick activity that's great for all ages. Get the instructions at Happiness is Homemade.

And because I couldn't decide which one I liked better, I also wanted to share this artificial zinnia floral arrangement, from A Fanciful Twist.

Siao

Growing up in Edmonton and having great access to the Rockies, I have a natural affinity towards the mountains.  I'm always trying to find ways to recapture those moments of adventure and calm. What better way to evoke these strong emotions and memories than to use the good old olfactory sense? Using essential oils and collected pine cones, you can easily make scented decor pieces around the home. Learn how at Apartment Therapy.

Mallory

Pine cones are one of the most common things that we can find in our everyday surroundings here in Northern Alberta, but the biggest question is: 'What can you do with them?' One answer that isn't at the forefront of most minds is to use them to add texture to paintings! It's very easy to take them apart, sprinkle them onto a canvas with some glue, and paint over them to add texture to any painting — especially more abstract pieces, as pictured here.

Painting by Bradley Collins
Image supplied by Mallory

Do you have a great idea to share? Let us know in the comments.

Thursday, 28 January 2016

January Reuse-It Item: Board Games

Have you ever pulled out your favourite game, only to realize a critical piece is missing? Or maybe that well-loved board has fallen apart, and you suddenly have an excess of tiles and tokens.

Nobody could possibly want those, right?

Wrong! Here at the Reuse Centre, we take complete board games, but we also accept all kinds of spare chips, game boards, and cards. This month, our bloggers have put together some of their favourite ideas for reusing those extra bits and pieces.

Michelle

Here is a great way to repurpose an old metal Chinese checker board piece into a clock. You may find parts for the hands online or at watch shops. This would surely make a unique conversation piece for your home.

See the tutorial at Light & Spoon.


Mallory

Do the scattered pieces of old, unused board games litter your house? Do they lurk under couches and in corners, waiting for the chance to find their way under your feet so that they can have one last glorious moment of triumph as you limp away in pain?

Never fear, here is a wonderful tutorial from Living Like the Kings on how to re-purpose those pesky pieces into something a tad less dangerous for your unsuspecting feet. The best part? You can do this with any old board game pieces –  monopoly, clue, scrabble –  the sky is the limit!

Tamara

I saw an excellent idea for reusing old scrabble tiles: make some coasters! They're adorable, plus you get to play the game again and think of clever short words and/or phrases to put on your coasters. This is a great idea for making things like unique wedding favours or just to create a fun accessory for your table. Other than the tiles, you don't need much. All you need are some super glue, scissors, and cork or an old game board. Check out the details at Style & Elegance.

Sarah

These game-board shelves are genius! What a cute way to add a bit of colour and pattern to a room, without a lot of DIY effort. These would be great on any kid's wall, or as part of a household games room or family room.

Got any great ideas for using leftover board game pieces? We want to hear about them! Share with us in the comments.

Friday, 18 December 2015

Anything but Christmas Trees

Reuse-friendly Alternatives for a Different Kind of Christmas Tree

'Tis the season for retail marketing to challenge the concept of the traditional evergreen conifer tree. Why must they have all the fun?  Let's do our own mind exercise, and let's rethink and tinker.

In all its essence, the Christmas Tree is roughly triangular, conical, or pyramid shaped and it is meant to bring joy and cheer.  Simple!  This leaves so much opportunity to stretch our creative muscles and make our own beautiful, personal 'tree'.  Not everyone has the space or budget for a large tree, so this is also a nice reminder that there will always be a way to celebrate.

Before we run too wild, there are some key things to note. SAFETY FIRST!  Please make sure bulbs, lights and wires are not frayed and are rated for indoor use.  When designing your new festive tree, please consider fire hazards, weight distribution, load considerations, and the unpredictability/predictability of pets and kids.

You don't necessarily need to buy brand new supplies, but instead you can pull things from around the house to create a festive look and then return them back to their shelves after the holidays.  Consider giving some home staples a second purpose, rather than hiding your decorations away in a box for the rest of the year.  The Reuse Centre also has lots great supplies you could use.

Here are a few ideas I've come across:

- Siao (Volunteer)

Friday, 13 November 2015

Throw a Travel-Themed Party on a Budget with the Reuse Centre


Planning an event and short on cash for decorations? No problem! You can pull together some travel-themed party decorations with a little bit of crafting and some of the awesome resources from the Reuse Centre.

For this event, I decided to make wall decorations, a banner and a travel-themed signpost. I also printed and cut out “passports” that served as the door prize entries. I’ve also seen similar passport-style invitations and place cards for weddings.

The banner:

  1.  First, I collected a stack of old maps from the Reuse Centre. These had fallen out of some donated National Geographic magazines. I also grabbed some poster board remnants and some leftover tissue paper (to be used for wall decorations later).
  2. Using a standard word processing program, I printed out the letters I would need for my banner—one letter per 8.5x11 page—and cut them out.
  3. I traced these letters onto the maps (varying the colours and types of maps) and cut them out.
  4. I glued the map letters onto poster board and cut these out as well.
  5. Once I had all my letters, I laid them out face down on the floor in order, careful to get the spacing and alignment right. I used the grooves in my wood floor as my guides.
  6. Next, I stretched two lengths of monofilament (fishing line) over each set of letters (I created my banner in two sections, to hang one above the other). I taped the monofilament down to the floor.
  7. Using a glue gun, I attached the monofilament to each letter.
  8. I hung my new banner! It may shift or drape when you hang it. Gently pull it taut to straighten it out.

Voila!

The wall decorations (seen above and in the image below):

  1. I started by selecting travel-themed graphics from a simple Google search.
  2. I printed the images onto paper and cut them out to create basic shapes
  3. Like the letters, I traced these onto maps and cut out out the outlines. For the moment, I left the interior cuts (e.g. the car windows) alone.
  4. I glued the shapes to poster board and cut them out. The board made the images more stable. I used a craft knife to cut out the interior shapes for those images that had them.
  5. I cut small pieces of coloured tissue paper and glued them to the back of the shapes with interior openings to create a “stained glass” effect.

Here are some of the other shapes I made.
To fill in blank wall space, I hung up all of the extra maps.
The signpost:
For the arrows, I used an old pack of wooden stakes that I hadn’t gotten around to using in my garden. For the post, I used a scrap piece of 2x2" lumber. Rather than building a support for the bottom, I opted to put the post into an old Christmas tree stand, disguised with a piece of scrap black fabric.
1.       Paint the post and stakes your desired colours.
2.       Choose locations that are relevant to your event or theme. Use Google Maps to find out the distances from where you are.
3.       Paint the locations and distances on the stakes in the correct directions.
4.       Pre-drill each stake for two screws (to avoid splitting the wood) and then screw each stake to the post. I opted to put stakes on all four sides, but you could easily do one or two only.
5.       Set the post in the Christmas tree stand and straighten it. Tighten the screws and cover the stand with fabric.
Where's your next destination?

Bon voyage!!

- RuthAnn (volunteer)

All photos provided by RuthAnn

Friday, 30 October 2015

October Reuse-It Item: Crayons

The Reuse Centre accepts crayons of all shapes, sizes, and colours. We'll take them new, used, and even broken! This month, our blogger volunteers have come up with a list of great ways to use up those old crayon stubs and pieces, that might not be great for colouring anymore.

This box of nearly-new crayons was donated to the Reuse Centre!

Michelle

Do you love Play-Doh®? I love Play-Doh®!

Here is an easy tutorial you can follow to make Play-Doh®-style putty at home, in all the colours of the rainbow.

All you need are crayon pieces and a couple of common kitchen ingredients to make this simple recipe. It's perfect for playing!

Get the tutorial at sugaraunts.com.

Nichole

I loved to colour when I was a kid, but as soon as the crayons became too short for me to sharpen I would always just toss them away. This craft uses all of the crayon nubbins earmarked for the garbage bin, and makes unique ornaments that you could use on your Christmas tree, or as that pop of colour in your home decorating!

The instructions, from the blog Living, Loving, Laughing & Creating Everyday, seem pretty simple: take the top off of a clear ornament ball, place a few crayon pieces inside, put the top back on and heat gently with a hair dryer until the pieces melt, swirling so the wax spreads around. Be careful - it sounds like it could get a little hot, but the results are worth it!

Tamara

Crayons are lots of fun, but when they inevitably get broken and stubby, what can you do with them? A practical reuse idea for crayons is to make a candle out of the pieces.

Other than soy wax (unless you're already a candle maker extraordinaire), chances are you already have most of the items you need at home. Check out the full instructions here.

Who doesn't love candles? They're so colorful, too! Enjoy!

Siao

The days are getting shorter and the nights are getting longer, so let's brighten up the place with colour and illumination!  This is a simple idea, with great results. Use leftover crayons to scribble on white paper bags. To melt the crayon, set a piece of parchment paper on top of the bag and iron it. This blends and swirls the colours.  

Punch holes throughout the paper bag to allow more light to flow, and then place a small tea light candle inside a plastic cup or glass holder inside the paper bags. If you're concerned about fire safety, you could also use a battery powered faux candle.

Get the full set of instructions at Aunt Peaches.

RuthAnn

My good friend Patti received this lovely handmade picture, made with crayons, for her birthday.

Make your own gorgeous artwork by melting crayons!
Image provided by RuthAnn.
Here's how her friend, Tammi, made it!

Materials needed:
Canvas
Crayons (this project used the equivalent of two boxes)
GOOP® (or another industrial adhesive; glue does not work)
Hair dryer

Set the canvas up at the angle you want your colours to run. The process is messy, so be sure to put a drop cloth underneath your project.

Use the GOOP® to adhere the crayons to the top of the canvas. You can peel the labels off of the crayons if you want to, but it's not necessary. Use the hair dryer to melt the crayons. It takes a few minutes to get going, but once they start to drip, it goes quickly. Angle the hairdryer in the directions that you want the wax to run, to blend colours.

Choose the image you want for your silhouette. For this project, Tammi combined two images (Eeyore and an umbrella). Glue your image to black card stock, trace, and cut it out. Remember that your image will be reversed when completed, since you flip it over to use the black side. Before sticking it down, make sure it is facing the way you want the final product to appear. Use goop to adhere the image to the canvas, and voila!

Tuesday, 27 October 2015

DIY Halloween Deadcorating

As an adult, I think I'm more excited about Halloween than I ever was when I was a kid. When you're little, you're mostly in it for the candy. When you're grown, you get to make your house look super creepy and then invite all of your friends over for an awesome party!

Store bought Halloween decorations can get pricey, and most of them have a definite "store bought" quality to them that can ruin the creepy effect you're probably going for. I found some great DIY "deadcorating" ideas to give your place that ghoulish, unsettling vibe this Halloween.


Paint It Black
Paint makes everything better...and black paint makes everything creepy! Those little porcelain jugs and figurines found in every thrift shop and your grandma's basement become decidedly sinister with a coat of black spray paint. Use them as delightfully macabre centerpieces on your snack table, or place them anywhere in your home where your guests might end up. The black really lends itself to Halloween, but these painted jugs or figurines look so sleek that you could use them year round.

Fake Flowers Are Your Friends
Found in any craft or thrift store, fake flowers come in a wide range of colours that can cheer up any room or project. That simply won't do for your Halloween decorations, but it's nothing your trusty black spray paint can't fix.

Besides giving your home that deathly quality, fake flowers also give you the opportunity to put together some truly unsettling arrangements, like eyeball flowers! Inspire nightmares by gluing fake eyeballs into the middles of fake flowers. Might I suggest you then place them inside your painted jugs?


Turn Everyone Arachnophobic
No Halloween is complete without creepy crawlies, and these DIY projects don't disappoint. If you can get your hands on a few pairs of stockings, you can make some really awesome hanging decorations for your yard, or to suspend from the ceiling in your party zone.

One great idea that I came across requires a stocking, a balloon, and a glow stick. Put 'em all together and you get this really great ethereal effect that looks like ghosts, or spider eggs, or maybe even glowing brains.

If you're looking for more of a classic, spidery display, a stocking filled with cotton balls or stuffing and covered in fake spiders will do nicely. If you're worried your guests might leave without developing a lifelong phobia, try hanging a few spiders from the "egg sacks" with thread or dental floss.


Private Eyes Are Watching You
Toilet paper rolls, a box cutter, and glow sticks are all you need to unsettle your guests and neighbourhood trick-or-treaters at your doorstep. Place these glowing eyes in unexpected places around your yard, or even in your home (bathroom, pantry, coat closet, etc.), and see how many people notice they're being quietly watched.

Happy Halloween, from the Reuse Centre!

-Nichole (Volunteer)

Wednesday, 21 October 2015

Magazine Strip Silhouette Art

This summer felt like it stampeded by, so it was particularly nice to have a free Saturday morning! I ended up blocking it off for a fun project with friends which included coffee, craft therapy, and grownup talk.  The project at hand was to make magazine strip silhouettes, and my goal was to make it simple, modern, and a fun distraction from our routine troubles.

Step One: Print Stencil/Silhouette
In preparation for this project, you'll need to choose your images. We found stencils and silhouettes online, then resized them to print onto a full letter sized page.  Images with more surface areas are ideal. For more intricate images, like the zebra, fish or raccoon-Mario, an alternative is to use the magazine strips for the background, rather than for the silhouette itself. (You'll see what I mean later!)

We had a wide variety of images to work with!

Our magazine stash.

Step Two: Choose Colourful Magazine Pages
Pull out pages with a lot of colour or intricate patterns, which will make the silhouette look fuller.  Try to choose pages with colours that will contrast with the background paper you intend to use.

It's okay to have some pages with words or body parts, since these won't be very noticeable in the cut strips. 


Step Three: Cut Strips from Magazine Pages
Fold the magazine pages accordion-style to create nice, straight cutting lines that are the same distance apart. Alternately, you can use a ruler and draw cutting lines. Note that the thinner the strips, the more gluing you will have to do.

Cutting the strips takes patience, but it's worth it!
Be very careful to cut as straight as you can, because it will help when pasting the strips side-by-side. While cutting, my friend came up with an ingenious plan to use a shredder.  Try it out and let me know!


Paste strips on the back
of a printed page.
Step Four: Glue Magazine Strips to the Back
The fun part! Paste the strips as you please on the backside of the stencil pages. The pattern is up to you. We alternated a variety of strips of different colours to make a rainbow effect.  I have seen some projects done with gradients of the same colour, which has a desirable look as well.

Keep in mind that the strips only need to cover the image, so you don't necessarily have to cover the entire page.  Rotate and place magazine strips strategically, depending on where the image cutout will be.  Some of the strips won't be cut perfectly straight, so just overlay them to ensure no blank spaces are showing.

Step Five: Cut out Silhouette and Paste Striped Silhouette onto Paper
Depending on the silhouette, you can also turn the original cut sheet into a second art piece, as with the deer silhouette shown below. As I mentioned earlier, this would work really well for more intricate images like the zebra.

The negative space inside the remaining magazine strips still looks neat! 
Cut-out striped silhouette.
Left, we have the striped silhouette on coloured paper, and on the
right, the leftover striped background over coloured paper.
Step Six: Enjoy Finished Art Piece! Frame and Gift at Your Leisure.
I'm really glad that this turned out so well!  We were really worried that this would turn out to be a pinterest fail moment.  I still have tons of magazines left over, so I will have to come up with another craft therapy session soon!
Our finished silhouettes, ready for display.

- Siao (Volunteer)

All photos provided by Siao.

Wednesday, 30 September 2015

September Reuse-It Item: Jars

Here at the Reuse Centre, we accept mason jars and baby food jars. They're great for canning, making preserves, storing food or small items, and home organization. This month, our blogger team has shared some other fun and useful ways to reuse old glass jars!

Michelle

Here is a tutorial I found a few months ago that teaches you how to turn your mason jar into a sippy cup.

For a special touch, you can also use chalkboard paint to make a label area. Nobody will get their cups mixed up at your next party!

Check it out at Instructables.

Siao

Old jars, new lids! Just top the old lids with figurines or plastic animals.  All you need are some solid paint and strong glue to create this refreshed look.  The jar maintains its function, but the new lid adds a pop of colour and personality.

These is great for party favours, kids' storage, and general modern décor.  Looking for some cute topper combinations? Try rabbits for Easter chocolate jars, a nutcracker for nuts, cats or dogs for pet treats, a bride and groom for wedding favours, and lego men for organizing building blocks.

See the instructions at Paris Bourke.

Emma

I love to make mini pin cushion and pin jars from baby food jars. They make a great little stocking stuffer for sewists and other crafty people, and they are so cute. There are many different methods to make these, but PrettyPrudent.com has a quick, easy to follow tutorial.

Tamara

One of my favourite foods is jam. Homemade jam is even better. Glass jars are perfect to store jam, and reuse over and over again, because who would ever get sick of jam? Glass jars are also great for storing a variety of items, or food that doesn't spoil (e.g. sugar and spices).

I've also used jars for decoration. When I first moved into my place, I didn't have any vases for flowers so I just used jars instead. I liked the look so much that I decorated with various assortments of jars and fake flowers. This blogger spray painted her glass jars and the outcome is awesome!

Lana

Autumn, while beautiful, makes me a bit sad because it reminds me of the winter that's coming.

Here's a way to save a little of the lush greenery of summer indoors, by making a glass jar terrarium!

Makezine  and Design Sponge give the basics on just what to do. I can't wait to customize my own!

Friday, 25 September 2015

ReStore - Reducing Waste with Habitat for Humanity

When we moved three years ago, our semi-new couch couldn't fit through the door.  It sat in the garage for a whole year, reminding us of our poor planning and unfortunate waste of a good piece of furniture - but wait!  Just like an unused craft kit is happily accepted at the Reuse Centre, gently used furniture is welcomed at Habitat for Humanity's ReStore!  I called for a pick up and that was that.

Welcome to the ReStore!
I thought very little of the ReStore again until several months ago, when my neighbour started developing her basement.  Costs for all-new building materials were outside her budget, but she knew about the ReStore's other side. They offer reasonably priced building materials. Together, we went for a visit.

The ReStore North location is a medium-sized warehouse. I expected to find a lot of furniture, but it couches, tables, and chairs actually took up very little of the floor space.  Instead there were pallets and shelves full of tile, carpet, hinges, and screws.  There was also an area for light fixtures, sinks, and kitchen cabinets.

Look at all of that flooring!
I learned that the ReStore is "a retail outlet that sells new and gently used building materials and home improvement items".  The stock is made up completely of donations from individuals and businesses. Also, like the Reuse Centre, they promote waste reduction through reuse. Since opening in 2000, they have diverted "over 12,000 tons  of reusable and resalable items from local landfills."

My neighbour found carpet and underlay for less than half the price of new materials(likely a donation from a building site, where the end of roll wasn't usable).  I eyed kitchen cabinets that I later learned may have been part of their Kitchen Salvage Program, which enables residents to donate their whole kitchens before renovations.  

Need new baseboards or wainscoting? I found plenty!
A kitchen reno is probably quite a few years away for me, but in the meantime I'll definitely look to ReStore for any of my future home improvement project supplies.  Aside from the cost savings, I'll know my purchases will help reduce landfill waste and support a good cause.  

All proceeds from ReStore fund Habitat for Humanity's administration costs. This means that every dollar donated directly to Habitat for Humanity goes directly to building homes and serving families.

Read more about Habitat for Humanity here. 


- Lana (Volunteer)

All photos taken by Lana and published with permission of Habitat for Humanity Edmonton.

Thursday, 2 July 2015

Broken Teacups: Finding the Silver Lining

I collect teacups. Some are collected from garage sales, others are purchased brand new.  These have cost me anywhere between $0.20-$60.00 per teacup and saucer set, but each is precious and invaluable to me, so I take extra care whenever I use them.  More than collecting teacups, I love hosting tea parties.  Guests are delighted to claim their special pattern for the afternoon, but no matter how gentle my guests are, accidents still can happen.  So to prepare myself for a broken heart and china, I learned more about repairing pottery and discovered the art of Kintsugi.  

Kintsugi or Kintsuguroi is a technique to mend broken pottery with a philosophy of beautifying its wear and tear rather than hiding it.  This method fills in the missing pieces and glues the broken edges together using lacquer resin with metallic dust, coloured in gold, silver, copper or bronze. Chips and tumbles are part of the life of the ware, so it aims to highlight its history while repairing it to be used once more. 

Outside of pottery, Kintsugi is so poetic. It speaks to me about growing and aging as a beautiful transformation.  It encourages me that when we go through life and have pieces of ourselves worn or cracked along the way, we are also changing and building shinier, prettier pieces of ourselves.  
 
We can also apply this same idea onto our favorite subject, Reuse.  Just because something is broken, it does not immediately lose its value.  Do not throw it out just yet - Stop and consider the possibilities and options you have.  Can this be repaired? Are there still workable spare parts? Would this be a good item to repurpose? Create the silver lining.


- Siao (Volunteer)

Tuesday, 9 September 2014

August Reuse-It Item: Paint Swatches

Anyone who's ever done a big painting project knows that it's easy to accumulate a ton of those paper swatches, fast! Ecru vs. Eggshell, and oh, this brand's Forest Green looks just a tad darker than that brand's Evergreen. Whether your project is big or small, it's important to get the colour just right, so those little swatches come in handy! There's no denying that they're useful, but what do you do with them after you've made your choices?

If you're like many Edmontonians, you bring them to the Reuse Centre! This month, our blog team has put together a list of our favourite ways to reuse paint swatches.


Michelle

Paint Swatch Collage

Using cut out circles of paint swatches, create a stunning effect of ombre colors. I have also seen triangle cut outs attached side by side.

Don’t forget to frame your art work!


Sarah

I always have a book on the go, (sometimes two or three at a time!) but I don't actually own any bookmarks. I resort to using receipts, scrap pieces of paper, and the torn-off ends of opened mail.

I really love this simple and cute idea for reusing paint swatches and personalizing them with permanent ink or paint. This a great all-ages craft and perfect for back-to-school.

Nichole

There are so many cool and beautiful ways that paint swatches can be repurposed that it makes me want to take a cloth bag to Home Depot and clean them out. For instance, while I've always thought that mosaics are an interesting way to tszuj up a table top, the idea of smashing up ceramics for it seemed messy and slightly dangerous. But this doesn't have to stop me anymore now that I've found this awesome idea for creating a mosaic look with paint swatches! Just secure the paint chips to the wood top and cover with a piece of glass, and you have a gorgeous work of art that you can tailor for any room.


Lana

While the pretty colours of paint swatches make them perfect to incorporate into parts of a scrapbook page or a handmade card, the paper is generally not acid-free or of archival quality.

"Hey Gorgeous", takes advantage of the perfectly matching colours and light weight to create a customized chandelier that's full of movement. Check out the tutorial here. The same technique can be used for a lampshade or a mobile.


Emma

Visit Poppytalk to see how this amazing feature wall was made over the course of a weekend!

Like cleaner lines and a little more order? Design Sponge also has a great example of a paint chip wall

Or if you don't have half of Home Depot's supply of paint chips, a handy dandy calendar, could totally be made from a Reuse Centre picture frame!

Visit DIY Projects for instructions on how to make this cute, custom calendar.


Do you have a great idea that we missed? Add your paint-swatch reuse ideas in the comments below!

Tuesday, 29 July 2014

July Reuse-It Item - Pill Bottles

July's Reuse Item is pill bottles! These little things seem so useful, it's hard to throw them away, and we see loads of them coming through the Reuse Centre. Read on for some practical and unique ways of reusing this common household item!

Lana
Blog team member Emma thought this would be perfect for
Walking Dead or Hunger Games aficionados!

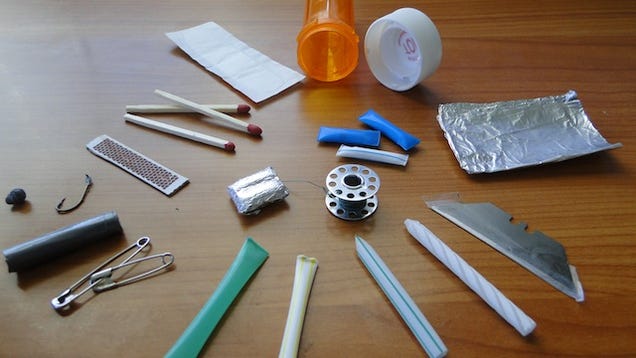
Waterproof and compact, prescription pill bottles are great re-purposed as a travel container. But even if you're not going far away, one would make a perfect little "emergency kit" for day to day. A few spare safety pins, needle, thread (or dental floss), and buttons, and you can fix and prevent a wardrobe malfunction. Include plaster bandages, allergy pills, and a rolled five dollar bill and you'll likely have all bases covered!

Sarah

When pill bottles came up this month, I thought I was going to have a hard time coming up with something other than "put stuff in them", but you really can find anything on the internet!

Can you believe that these gorgeous earrings were made from cut up pill bottles? Check out this article on LilacPOP for more really fantastic examples of jewellery made from pill bottles, including necklaces and more earrings.

The examples on that blog are all made from orange bottles, but the Reuse Centre also sees plenty in blue, fluorescent green, and clear that would look great, too!

Emma

Always forgetting your key? Try keeping a spare somewhere covert with this awesome stealth key hide.
Simply glue a rock to the top of your pill bottle, close up your key inside, and push it down into the dirt. Now you just have to remember which rock it's under!

Visit Thrifty Fun for this and other great ideas.


Nichole


When I see pill bottles, I think of handy ways to keep hair pins and craft supplies organized. When artist Mary Ellen Croteau sees them, however, she sees the potential for installation art.

Her ongoing "Endless Columns" collection, featuring plastic bottle caps, jar lids, pill bottles and other materials that aren't easily recycled, is a social critique and visual challenge for us to look at everyday things in a different way.

Visit her online gallery to see more photos and learn about this innovative art project.


What are your favourite ways to reuse pill bottles? Share your ideas in the comments below!