Tuesday, 26 December 2017

6 Recipes to "Reuse" your Holiday Dinner

One of the best parts about the holidays is all the gatherings and shared meals. I love a turkey dinner with all the fixings, but by the third day of turkey sandwiches for lunch after the holiday it gets a little old.

I hate to see good food go to waste so I make every effort to avoid throwing out my leftovers. Here are some quick and easy recipes to "reuse" those holiday leftovers.

Turkey Enchiladas
These healthy turkey enchiladas are a great way to use up leftover turkey while feeling like you're eating a brand new meal.

Check out the recipe at Creme de la Crumb.

Turkey Soup
The air is cold and the nights are long -- it's the perfect time of year to warm up with a hot bowl of soup.

Try Uproot Kitchen's turkey orzo soup, or for something a little heartier, creamy leftover turkey stew from The Goldilocks Kitchen.

Mashed Potato Puffs
I admit that I haven't tried these yet, but these mashed potato puffs from The Cooking Jar look absolutely amazing. I might just have to make some extra mashed potatoes to try them out!

These look like they'd also work really well with sweet potatoes, beets, or any other mashed root vegetable.

Mashed Potato Rolls
Potatoes and bread rolls -- honestly how could that be a bad thing? Num's the Word's mashed potato rolls are a little bit more work than most of the other recipes in this list, but they're worth it!

Hawaiian Fried Rice
You can't get much further from a cold and snowy winter day than sunny Hawaii. Toss rice, veggies, pineapple, and your leftover ham together for this "better than takeout" dish.

Get the recipe from The Recipe Critic.

Ham and Potato Cheddar Soup
Also from The Recipe Critic, this ham and potato cheddar soup will warm you from the inside out.

For a double leftover-busting whammy, you can substitute leftover roast potatoes or throw in any extra cooked veggies after you've cooked your soup.

What are your plans for finishing off those holiday leftovers? Share your favourite recipes in the comments!

- Sarah (Volunteer)

Friday, 22 December 2017

Tis' the Season for a Wasteless Christmas

The holiday season is in full swing as the Christmas carols are playing and the smell of gingerbread is in the air. There are many festivities to enjoy with an ample amount of food, decorations, gifts and more. Yet with the holiday season, comes more waste.

Did you know that the Edmonton Waste Management Centre receives increased volumes of waste over the holidays. Household waste doubles in the weeks following December 25. Now that's a lot of waste! We may love the holiday season, but how can we reduce our waste?

Here are some changes that you can make this holiday season to decrease your waste. Don't forget to share this information with your family and friends, so that we can all work together to reduce our holiday waste.

1. Waste-friendly gifts

Still need some last minute gift ideas? You may not have time to upcycle reusable materials into a unique gift; however, you can still give waste-friendly gifts that are easy and affordable. Why not give experiences such as movie tickets, attraction passes, workout classes, theatre tickets or a gift certificate for a dinner for two. 

Another option is to donate your time and skills as a gift. Maybe you can gift house renovations, a resume consultation, pet sitting or even child minding services.

2. Waste-smart gift wrapping

Why not wrap your gifts using reusable materials. This can include scarves, tea towels, blankets, magazines, newspaper and more! Be creative in your wrapping by re-purposing materials to reduce wrapping waste this year.

3. Decorate for lasting memories 

If you are feeling crafty and have the time, making your own holiday decorations out of recycled materials is a great way to reuse. The Reuse Centre has plenty of materials to choose from. You can follow us on Facebook for some creative ideas.

If you don't have the time to create your own upcycled holiday decorations, try to buy quality decorations that will last from year to year. For low prices and a varied selection, visit the Reuse Centre.

Have any unwanted holiday decorations? Donate them to the Reuse Centre or a local charity.

In addition to seasonal decor, the Reuse Centre accepts artificial Christmas trees.

Did you know that the City collects natural Christmas trees? Pickup begins January 9, 2018. Visit edmonton.ca/christmastrees for more information.


4. Plan your festive feasts

The holidays are the time of year when we gather with friends and family to enjoy the best this season has to offer - Christmas dinner!

When planning your meal, check your cupboards before hitting the grocery store to avoid buying too much.

Plan to store and use your holiday leftovers. One way to deal with extra leftovers is to ask guests to bring their own container to take leftovers home.


Donating any unopened treats to a local charity is a great way to reduce food waste and support the community.

5. Waste sorting

Even if we make a conscious effort to reduce our waste, most of us usually have waste items for disposal after the holidays. It is important to put that waste in the right place, so it can be collected and processed properly.

If placed in the garbage, long, stringy things like Christmas lights can get tangled it the processing equipment at the Edmonton Waste Management Centre, resulting in serious damage or even plant shut downs. These items, and anything with an electrical cord or battery, should go to your nearest Eco Station.

Another confusing item is wrapping paper. While plain wrapping paper can be placed in your blue bag, foil wrapping paper cannot be recycled. Metallic/foil wrapping paper goes in the garbage, or if the pieces are in good condition, bring them to the Reuse Centre! 

To learn more about what goes where, download the WasteWise app or visit edmonton.ca/wastelessholidays

Wednesday, 6 December 2017

Reuse Centre Holiday Contest

Get in the holiday spirit by upcycling reusable items into festive creations! We are hosting a holiday contest at the Reuse Centre from December 1-20, 2017. Check out the details below.

Enter to win an exclusive 2 hour crafting workshop for up to 20 adults or children (min 6 years) at the Reuse Centre. All materials included, plus some treats.


Ready to enter?

1. Snap a before photo of your reusable items.
2. Upcycle your reusable items into holiday décor, Christmas presents, advent calendars or other festive creations.
3. Take an after photo of your holiday creation.
4. Send your before and after photos to reusecentre@edmonton.ca or drop off copies in person at the Reuse Centre.
5. All entries will be entered into the draw. The winner will be notified on December 21, 2017 by phone and email.

The contest runs from December 1-20, 2017. All entries must be received by 11:59pm(MT) on December 20, 2017.

Please see the official contest entry rules for more information.

Thursday, 2 November 2017

Makeup Palette Upcycle

What can you do with all your expired makeup palettes? Let's admit that the amount of makeup product that is expired or that you may not use, can be a bit excessive. A friend recently gave me a great idea which I have adapted to make more versatile. Her suggestion was to use nail polish to upcycle your old palettes, so that kids can play dress-up with "makeup" which won't make a mess. It's an easy task:

1. Use a pointy or sharp object to dig out and remove the expired makeup. Alternatively, you could also wait until your palette is empty.
2. Clean out the trays with rubbing alcohol and let dry.
3. Pour a small amount of nail polish in different colours into each section.
4. Let it thoroughly dry.
5. Add a clean foam brush.
6. Give it to your child!

Photo: Ellen Hanna
Play makeup palette. Photo: Ellen Hanna
Added bonus: a super neat design on the front. Photo: Ellen Hanna
Another option is to use acrylic paint. Since my son had no interest in pretending to paint colours on his face (he's much more effective with his actual markers), he used the different colours as buttons. He calls the palette his "com" for communicator that talks to people like a walkie-talkie: issuing and receiving commands and addressing emergencies. Yet, my daughter uses it as a smartphone. She particularly loves the mirror and pretends to talk to "dada" (she is one and a half).
A secret compartment reveals an emergency button linked directly to the fire department or something.
Photo: Ellen Hanna
We added a smiley face directly on the mirror to remind my son to SMILE!
Photo: Ellen Hanna
I painted buttons since this compact didn't have individual wells.
Photo: Ellen Hanna
This is a great upcycling idea if you cannot recycle your compacts and palettes directly with the manufacturer. The uses are only bound by the creativity of your kids, so the sky's the limit!

And a fun little coincidence is that whatever pattern you paint onto the mirror will cast a fun reflection when playing with light.
Photo: Ellen Hanna

Thursday, 26 October 2017

DIY Reuse-Inspired Halloween Costumes

Still need a Halloween costume for the kids? With Halloween just around the corner, we have come up with some creative reuse-inspired Halloween costumes for the kids! Instead of buying new, why not get crafty with some reusable materials this weekend? Here are five great DIY Halloween costume ideas for kids.

1. DIY Rain Cloud

Rain, rain, don't go away. Instead, let your child embrace the weather by being a rain cloud this Halloween. Upcycle an old hat, polyester, felt and yarn to create this seasonal look. Add some rainboots and your child will be a walking "rainy day".

2. DIY Toy Soldier

Does your child love the colour green? Then this costume is just for them. Gather old clothes or head to the thrift store, and then spray paint them green. Create a green cardboard cutout for the base and then they are ready to be added to the toy box.


3. DIY Cabbage Patch Kid

Have a little one in the family? You can make a DIY Cabbage Patch Kid costume that surrounds the stroller. Reuse a cardboard box and upcycle yarn to make a wig for your child. Personalize the box with their name and you have your own Cabbage Patch Kid.

4. DIY Jet Pack

Is your child ready to blast off to the moon? Get them ready for Halloween by crafting a jet pack with old plastic pop bottles. Add some spray paint and pieces of felt to finish this look.


Enjoy upcycling reusable items this Halloween for your kids' costumes! Have any other great reuse-inspired costume ideas? Add them in the comments below.


Wednesday, 11 October 2017

Fused Plastic Bag Tutorial

Despite an unreasonably large stash of reusable fabric shopping bags, I somehow continue to collect plastic disposable bags. We recently blogged about 10 Disposables to Toss From Your Kitchen, so I am taking a renewed look at my waste and making a better effort to reduce my consumption. Meanwhile, I am experimenting with what to do with this collection of plastic bags.

Pinterest is a haven for creative repurposing ideas. Fusing several pieces of plastic together with an iron has been pinned in my account several times over. It was finally time to find out for myself if those crafty pinners are leading me down a path of melted messiness or fashionable eco-consciousness. Therefore, I tried making my own fused plastic bag!

I started by cutting off the seams of several plastic bags and laying each piece flat.
My plastic bags were all different sizes, colours and store brands.
Photo: Ellen Hanna
I opted to hide any logos or writing by keeping the plain side facing out. 
Photo: Ellen Hanna
I matched the various sizes until I had a stack of 8 layers. I placed a towel on the table for protection and a piece of parchment paper on the very top to protect the iron. Then, I pressed firmly until the layers were fused, but not melted away. My iron doesn't have specific temperature settings (or even helpful fabric icons to guide me) but I found the mid-temperature was best. The plastic shrinks considerably, so don't be alarmed!
I needed five pieces to create one bag: two sides, a front, a back and a bottom. 
Photo: Ellen Hanna
I repeated this process several times until I had five pieces of fused plastic sheets. At this point, I decided on measurements for my bag based on the largest size of sheet available.
I decided on the sizing based on measurements after my iron shrunk the fused bags. 
Photo: Ellen Hanna
Using a rotary cutter and a quilting square, I cut the pieces down to their final sizes.

Pieces of the bag, ready to be sewn.
Photo: Ellen Hanna
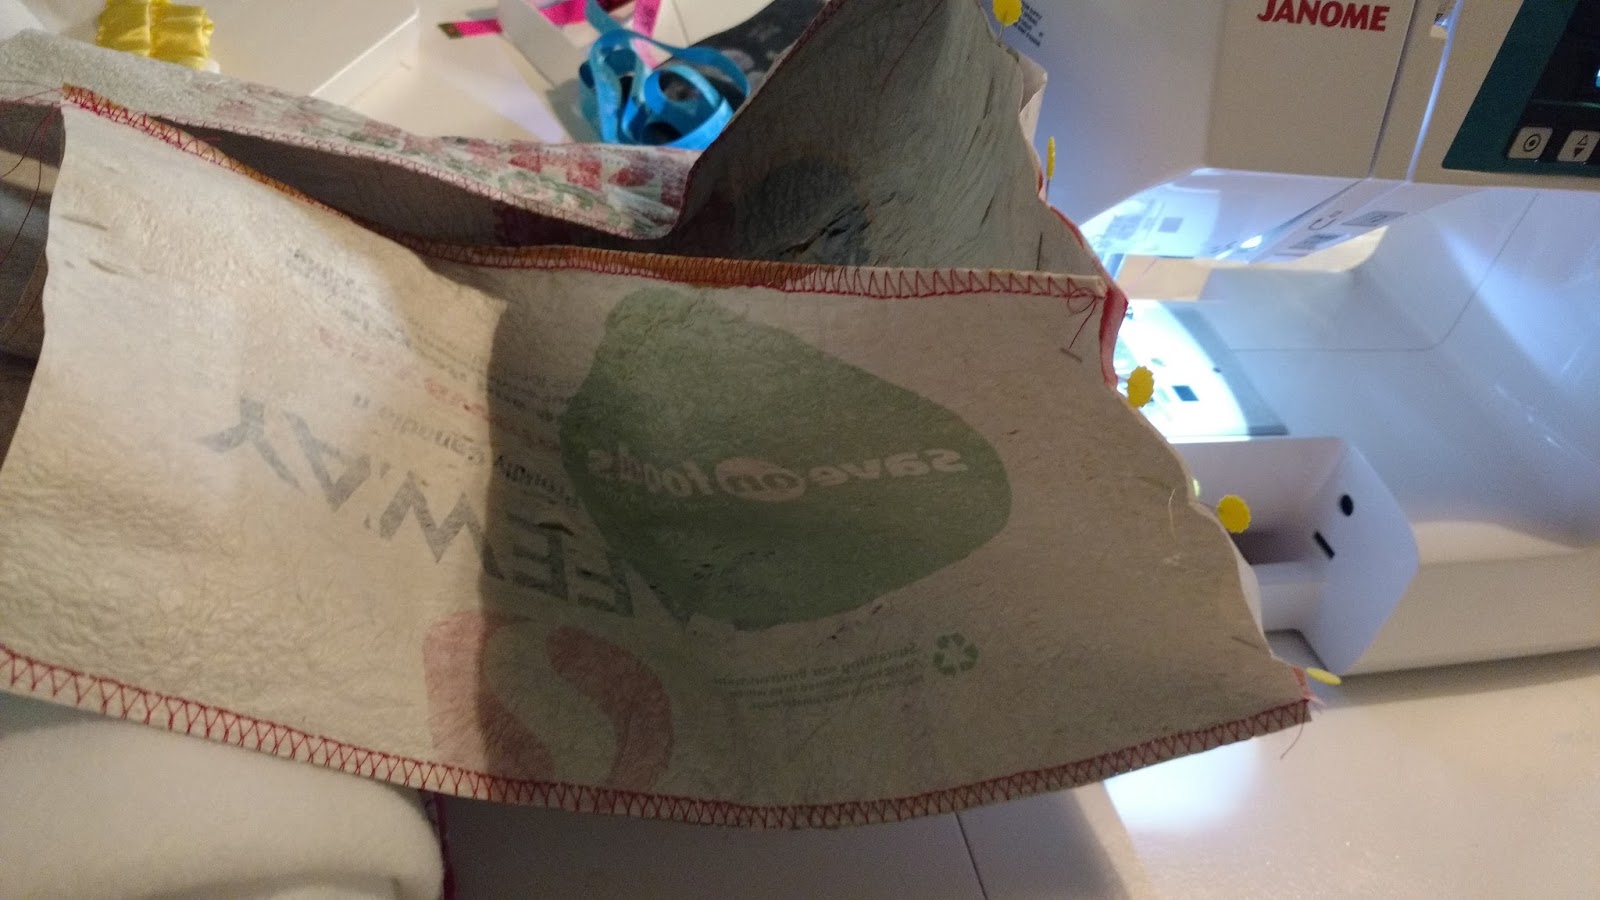
Then for the fun part! I used a colourful thread to sew the edges together. I don't think this material would lend well to being flipped inside out, so I opted for a visible stitch. I used the widest zig zag stitch, fairly tight. I held the stitch as close to the outer edge as possible.
Visible stitching with red thread. Photo: Ellen Hanna

Next, I pinned two pieces together, right sides facing out and sewed a zig zag stitch straight down. I sewed this on all four edges until the walls of the bag were created. 
The form of the bag beginning to take shape.
Photo: Ellen Hanna
The next step was a bit tricky, so I had to make sure to line things up carefully and use pins! I placed the bottom piece in place, then pinched the edges together in place, while using pins to secure. I picked a spot and started sewing a continuous zig zag stitch around the entire bottom. I was careful to backstitch in the corners to reinforce the bottom of the bag. 
The material is stiff; therefore, lots of pins are needed to keep the bag in place. 
Photo: Ellen Hanna
Stitching around the entire bottom of the bag, backstitching to reinforce in tricky places.
Photo: Ellen Hanna 
The last step was sewing on handles to be able to carry the bag. I decided on using fabric scraps instead of fused plastic for a more comfortable feel. I used a visible stitching for the handle which was similar to the bag. I simply folded a long scrap piece, ironed well and then zig zag stitched down the middle to hold in place. 
Simple fabric handles.
Photo: Ellen Hanna
For a more polished look, another option is to stitch a straight stitch down a folded piece to create a tube, then flip the tube inside out to make a strap without a giant zig zag stitch visible in the middle. However, I worked towards a "shabby chic" look and didn't mind the stitching showing or the rough edges on the inside. 
Fabric handles sewn to the inside of the bag.
Photo: Ellen Hanna
I made this in haste while my brother was visiting with his family. It was meant as a gift and I wanted to give it to them before they flew home. As it turns out, they have been using it as a diaper bag non-stop for the past 4 months. It has been dragged around everywhere, while being emptied and filled endlessly. It is still in great condition; therefore, this bag made with fused plastic bags is a real winner for strength! 
Not too shabby for a first effort!
Photo: Ellen Hanna
Happy crafting!
Update: Here's the bag after a few months of use, still going strong!


Photo: Tom Ewart
Photo: Tom Ewart


Photo: Tom Ewart
Photo: Tom Ewart

Wednesday, 26 July 2017

Disposables to Ditch From Your Beauty Routine

Back in April, I shared a post on 10 Disposables to Toss From Your Kitchen. As I was writing it, I got to thinking about all of the different disposable products in my home. Today, I'm sharing 6 disposables you can ditch from your beauty routine.

Disposable Razors
Disposable razors are big chunks of plastic that we throw away every month or so, even though only the blade is dull. If you want a smooth shave with hardly any waste, consider a safety razor. They cost more at the outset, but will save you a lot of money over time. 

If you're not ready to take that step, trade in your disposable razors for a sturdier model with replaceable blade cartridges. These produce far less waste than fully disposable models.

Facial Cleansing Wipes
Get back to basics with a facecloth and your cleanser of choice. Disposable wipes end up in the landfill, and so-called "flushable" wipes are also pretty bad for sewers, septic systems and waterways.

Ditch the makeup remover wipes by embracing the humble facecloth. Just pair it with your makeup remover of choice (in a recyclable bottle) or to reduce your waste even further, try making your own at home. Worried about mascara stains? Buy dark colours! 

Some companies even make reusable makeup remover cloths out of microfiber that claim to clean with just water.

Cotton Balls and Cotton Pads
Okay, so you might want to keep some of these around in your first aid kit, but our good friend the facecloth can do pretty much everything that a cotton ball can do, from removing makeup to applying toner. A dry facecloth corner can even help you get the perfect amount of smudge in your smokey eyeshadow.

For trickier jobs like taking off nail polish, try using a soft rag with your favourite remover.

Makeup Applicators
A decent set of makeup brushes will last you for years. They're washable and reusable, and generally give you more control over your eyeshadow than those cheap foam-and-plastic wands. Once you've got your brush, make an effort to buy brands that don't include the applicators to avoid that waste.

If the thought of trading in your concealer sponge for a brush gives you heart palpitations, remember that sponges are washable too! Even if they seem like they are meant to be single-use, you can wash and reuse them many times.

Cotton Swabs
Whether you are using them for cleaning or applying makeup, all those disposable cotton swabs are adding waste to the environment. Instead, use a reusable alternative, such as an eyeshadow brush to apply your makeup while reducing waste.

Face Masks
Single-use, individually-packaged face mask sheets seem to be the latest beauty trend. Aside from being kind of creepy looking, they're super wasteful! Next time your skin needs a boost, reach for a clay or cream mask that comes in a recyclable or reusable container, or try an easy DIY home recipe


What disposables have you ditched from your morning or before-bed routine? Share your ideas in the comments!

-Sarah (Volunteer)