Showing posts with label upcycle. Show all posts

Thursday, 2 November 2017

Makeup Palette Upcycle

What can you do with all your expired makeup palettes? Let's admit that the amount of makeup product that is expired or that you may not use, can be a bit excessive. A friend recently gave me a great idea which I have adapted to make more versatile. Her suggestion was to use nail polish to upcycle your old palettes, so that kids can play dress-up with "makeup" which won't make a mess. It's an easy task:

1. Use a pointy or sharp object to dig out and remove the expired makeup. Alternatively, you could also wait until your palette is empty.
2. Clean out the trays with rubbing alcohol and let dry.
3. Pour a small amount of nail polish in different colours into each section.
4. Let it thoroughly dry.
5. Add a clean foam brush.
6. Give it to your child!

Photo: Ellen Hanna
Play makeup palette. Photo: Ellen Hanna
Added bonus: a super neat design on the front. Photo: Ellen Hanna
Another option is to use acrylic paint. Since my son had no interest in pretending to paint colours on his face (he's much more effective with his actual markers), he used the different colours as buttons. He calls the palette his "com" for communicator that talks to people like a walkie-talkie: issuing and receiving commands and addressing emergencies. Yet, my daughter uses it as a smartphone. She particularly loves the mirror and pretends to talk to "dada" (she is one and a half).
A secret compartment reveals an emergency button linked directly to the fire department or something.
Photo: Ellen Hanna
We added a smiley face directly on the mirror to remind my son to SMILE!
Photo: Ellen Hanna
I painted buttons since this compact didn't have individual wells.
Photo: Ellen Hanna
This is a great upcycling idea if you cannot recycle your compacts and palettes directly with the manufacturer. The uses are only bound by the creativity of your kids, so the sky's the limit!

And a fun little coincidence is that whatever pattern you paint onto the mirror will cast a fun reflection when playing with light.
Photo: Ellen Hanna

Wednesday, 11 October 2017

Fused Plastic Bag Tutorial

Despite an unreasonably large stash of reusable fabric shopping bags, I somehow continue to collect plastic disposable bags. We recently blogged about 10 Disposables to Toss From Your Kitchen, so I am taking a renewed look at my waste and making a better effort to reduce my consumption. Meanwhile, I am experimenting with what to do with this collection of plastic bags.

Pinterest is a haven for creative repurposing ideas. Fusing several pieces of plastic together with an iron has been pinned in my account several times over. It was finally time to find out for myself if those crafty pinners are leading me down a path of melted messiness or fashionable eco-consciousness. Therefore, I tried making my own fused plastic bag!

I started by cutting off the seams of several plastic bags and laying each piece flat.
My plastic bags were all different sizes, colours and store brands.
Photo: Ellen Hanna
I opted to hide any logos or writing by keeping the plain side facing out. 
Photo: Ellen Hanna
I matched the various sizes until I had a stack of 8 layers. I placed a towel on the table for protection and a piece of parchment paper on the very top to protect the iron. Then, I pressed firmly until the layers were fused, but not melted away. My iron doesn't have specific temperature settings (or even helpful fabric icons to guide me) but I found the mid-temperature was best. The plastic shrinks considerably, so don't be alarmed!
I needed five pieces to create one bag: two sides, a front, a back and a bottom. 
Photo: Ellen Hanna
I repeated this process several times until I had five pieces of fused plastic sheets. At this point, I decided on measurements for my bag based on the largest size of sheet available.
I decided on the sizing based on measurements after my iron shrunk the fused bags. 
Photo: Ellen Hanna
Using a rotary cutter and a quilting square, I cut the pieces down to their final sizes.

Pieces of the bag, ready to be sewn.
Photo: Ellen Hanna
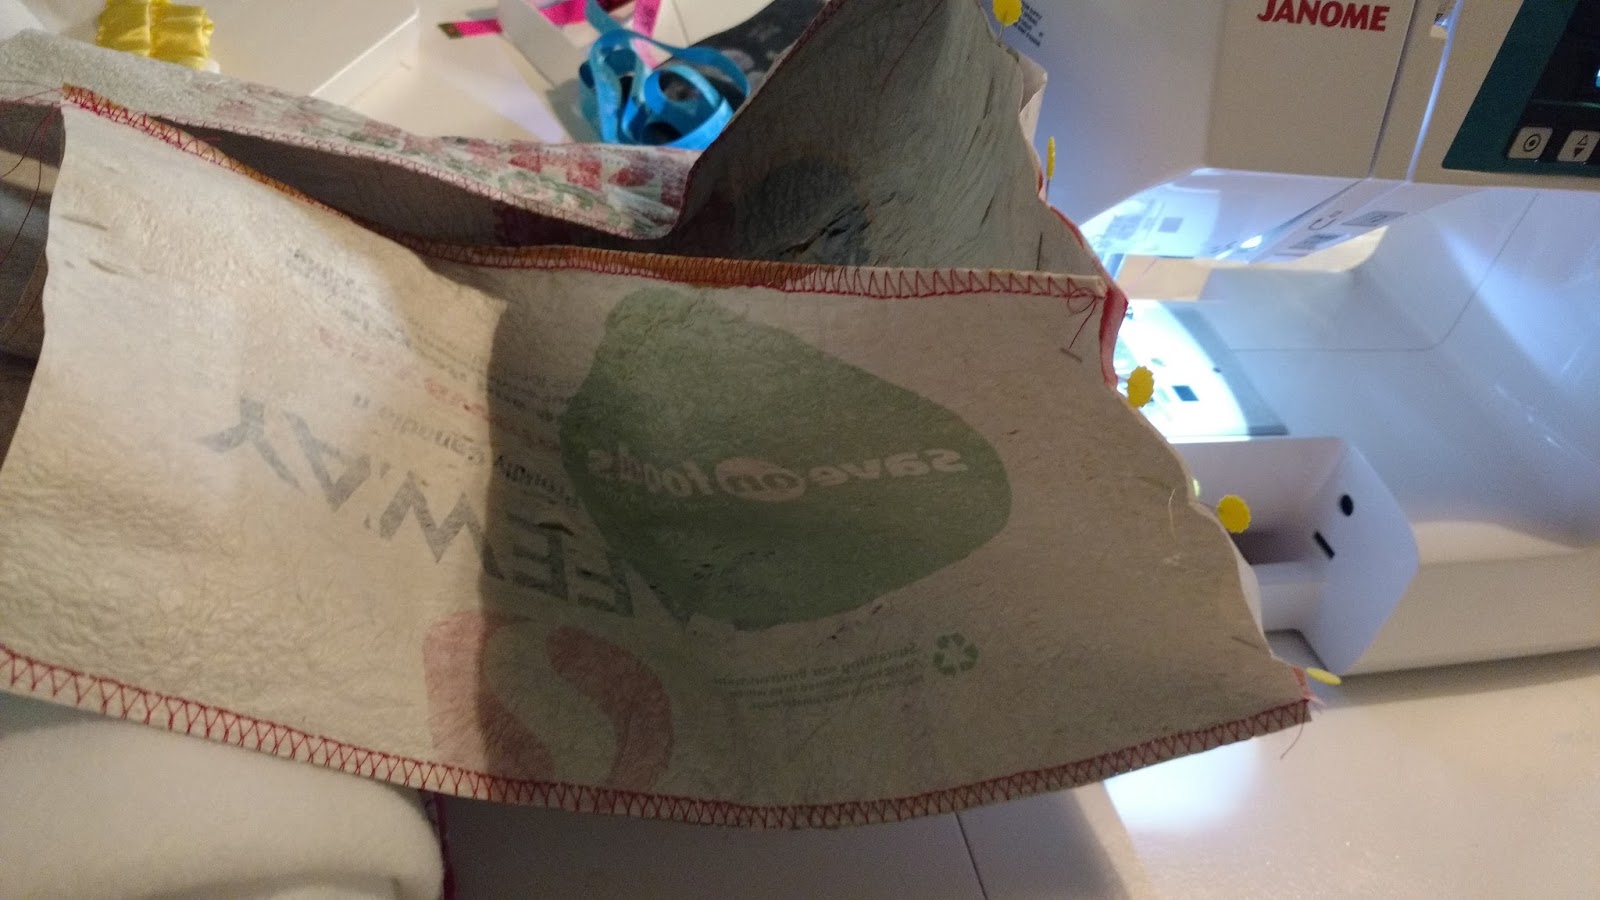
Then for the fun part! I used a colourful thread to sew the edges together. I don't think this material would lend well to being flipped inside out, so I opted for a visible stitch. I used the widest zig zag stitch, fairly tight. I held the stitch as close to the outer edge as possible.
Visible stitching with red thread. Photo: Ellen Hanna

Next, I pinned two pieces together, right sides facing out and sewed a zig zag stitch straight down. I sewed this on all four edges until the walls of the bag were created. 
The form of the bag beginning to take shape.
Photo: Ellen Hanna
The next step was a bit tricky, so I had to make sure to line things up carefully and use pins! I placed the bottom piece in place, then pinched the edges together in place, while using pins to secure. I picked a spot and started sewing a continuous zig zag stitch around the entire bottom. I was careful to backstitch in the corners to reinforce the bottom of the bag. 
The material is stiff; therefore, lots of pins are needed to keep the bag in place. 
Photo: Ellen Hanna
Stitching around the entire bottom of the bag, backstitching to reinforce in tricky places.
Photo: Ellen Hanna 
The last step was sewing on handles to be able to carry the bag. I decided on using fabric scraps instead of fused plastic for a more comfortable feel. I used a visible stitching for the handle which was similar to the bag. I simply folded a long scrap piece, ironed well and then zig zag stitched down the middle to hold in place. 
Simple fabric handles.
Photo: Ellen Hanna
For a more polished look, another option is to stitch a straight stitch down a folded piece to create a tube, then flip the tube inside out to make a strap without a giant zig zag stitch visible in the middle. However, I worked towards a "shabby chic" look and didn't mind the stitching showing or the rough edges on the inside. 
Fabric handles sewn to the inside of the bag.
Photo: Ellen Hanna
I made this in haste while my brother was visiting with his family. It was meant as a gift and I wanted to give it to them before they flew home. As it turns out, they have been using it as a diaper bag non-stop for the past 4 months. It has been dragged around everywhere, while being emptied and filled endlessly. It is still in great condition; therefore, this bag made with fused plastic bags is a real winner for strength! 
Not too shabby for a first effort!
Photo: Ellen Hanna
Happy crafting!
Update: Here's the bag after a few months of use, still going strong!


Photo: Tom Ewart
Photo: Tom Ewart


Photo: Tom Ewart
Photo: Tom Ewart

Thursday, 11 May 2017

Kid's Activity Mat: Upcycled Bed Sheet

Usually my old towels and stained clothing get broken down into cleaning rags, but bed sheets present a dilemma in terms of absorbency. They’re simply not great at cleaning. So when I encountered a tenacious bright blue paint stain on a fitted, king-sized sheet, I was forced to get creative on how to repurpose this item.

Meanwhile, I was preparing for a family road trip wherein two children under the age of four would spend 25+ hours in a car making picnic-type pit stops only to end up at the final destination to spend each day hanging about in the outdoors, picnic-style. Are you following me?

Enter the homemade picnic play mat!!

This craft requires: 

  • Fabric paint/markers 
  • Sewing machine and the ability to sew in a straight line 
  • Thread 

Optional: 

  • scrap fabric for trim 
  • scrap fabric for corners if using a fitted sheet 

I began by cutting out the elastic on each corner to allow the sheet to lie flat. Given I was working with a king-sized sheet, I should have cut the remaining flat piece into a rectangle but I didn’t want to lose the extra space so I kept it as is.

Next, I traced my design using a marker or pencil. Since we were embarking on a road trip, I drew a series of streets with landmarks around them before inviting my three year old son to help colour them in and add detail.

The transformation. Image Source: Ellen
We included a volcano, fire station, construction site, mountains, mine, boulders, lake, forest, and hospital. All the most important things, in my son’s opinion. I packed the fabric markers along with the blanket and we kept the artwork incomplete so we could invite our friends to continue the process while on vacation.

Highlights. Image Source: Ellen
If you’ve been working with a rectangle, you can simply fold the edges and sew a seam to prevent the fabric from fraying. Since I had four gaping corners, I filled them with some Canadian road trip fabric (how perfect!) and finished the entire thing with a bright binding along the edges.


Image Source: Ellen 
The final result is far from complete but will evolve as we spend time on it. It was dragged through seven states and two provinces and will now be used for picnics and play in our backyard and local parks.

How do you use old bedding? Share your thoughts in the comments section.

- Ellen (Volunteer)

Thursday, 9 February 2017

Upcycled Bouquets for your Valentine

Valentine's Day is right around the corner -- do you have plans to surprise your sweetheart? You don't have to break the bank to show them that you care. This year, gift a bouquet of handcrafted flowers that will last forever!

Here are six fun, unique ways to create your own eco-friendly, reuse-crafted flowers for friends, family, and that special someone in your life.

Necktie Roses

Put a funky spin on the classic rose bouquet by making some patterned necktie roses with this tutorial from Joallie Petit. Wild patterns work best, so hit up your favourite thrift store and see what you can find.


Egg Carton Roses

These egg carton roses from Todolwen are easy to make, and have a rustic beauty when made with plain cardboard egg cartons. For a more colourful bouquet, dip-dye or paint your finished flowers in any shade you like.


Pop Can Flowers

These are stunning! I would never have thought you could make something so lovely out of a simple pop can. Check out Crissy's Crafts for the tutorial, and for several ideas on how to use your creations.


Water Bottle Bouquet

This is a great craft for kids who want to make something special for a friend or family member. They're quick and easy enough to make one for every kid in class!

Find out how at Kid Friendly Things to Do.


Storybook Paper Roses

These are perfect for the literature-lover in your life. Grab an old book (preferably one that's in poor condition and can't be read anymore) and craft these elegant paper roses. Make your gift extra special by choosing a book that has meaning for your loved one.

Get the tutorial at 100 Layer Cake.


Pistachio Shell Flowers

I really love the look of these pistachio shell flowers. They're so bright and modern looking! A cluster of these in a nice, simple frame would make a great piece of wall art for your loved one.

See the tutorial at ReLoved Designs.

-Sarah (Volunteer)

Friday, 18 September 2015

Dorm Room Decorating on a Budget

When you're a university student living at home, you can still comfort yourself at the end of a tough day with familiar items and surroundings. When you're a student living in 'res', you may be lucky enough to bring a few of your familiar things into an otherwise soulless room that you may or may not be sharing. Even worse, you're probably also completely broke. 

Don't despair! There are a ton of ways to jeuje up your dorm room, organize yourself for school on a tight budget, and still have plenty of money left over for ramen noodles and beer. Some projects can be done with items you might already have or could borrow, and others could be done for a $5 shopping spree at the Reuse Centre. 

I'd like to share a few of my favourite budget projects for personalizing your dorm space and staying on top of school projects.

 DIY Dry Erase

Papers and exams can overwhelm you if you don't stay organized from the start. I always made sure to grab a free agenda during the first week of school, but I also liked having a wall calendar handy to help me plan a month ahead of time. Calendars can be pricey, but if you can pick up free paint chips at a hardware store or the Reuse Centre, a frame from your parents/Reuse Centre/dollar store, and a whiteboard marker, you can make a dry erase calendar to get you through the semester. Bonus points for giving your drab dorm room a punch of colour. Check out DIY Projects for inspiration.

Don't need a calendar? Instead of paint chips, fill the frame with a bit of gift wrap or scrapbook paper. Now you've got a super cheap dry erase board to leave reminders for yourself, or angry notes for your roommate.

Desk Organizers
When you only have so much space, it's really easy to clutter it up and make a big mess. Closets can quickly get out of hand, and course handouts can get lost in the ever-growing piles of paper. Help yourself stay organized with upcycled wicker baskets! Grab some old, outdated styles for cheap. They might be hideous under normal circumstances, but covered in a coat of metallic or bright-coloured paint, they will breathe life into your room and tame your mess. These beauties can become your new T-shirt baskets, paper trays, and pencil cups. If your grandmother doesn't have any, thrift stores and the Reuse Centre certainly will. 

Transform cereal boxes into attractive and useful organizers with a box cutter, your favourite fabric, gift wrap or magazine cutouts, and some tape. Use them for your paperwork, organizing your makeup, storing your hair appliances... Whatever you need! 


Closet Space Savers
This has to be about the easiest possible way to maximize your dorm room's non-existent closet space. Remove the tab from a pop can, loop one end over one hanger, and a second hanger through the other end. Voila! You've doubled your storage space and now you can keep outfits together. You can probably assemble enough pop can tabs for this in an afternoon if you recruit your friends. 

Another inexpensive space saver is to add shower curtain rings to a hanger, to keep all of your smaller items in one place. Belts, scarves, tank tops, you name it! If you're a purse junkie, you can also store them this way. Try your nearest dollar store or second hand shop for shower curtain rings, and make sure your hanger is sturdy. 

Of course, this is just a sampling of some of the easiest ways to personalize and organize your dorm space on a small budget. The Reuse Centre, your closest dollar store, and your parents' basement can hold a wealth of items to accessorize your student life, and a spot of paint can do wonders to turn something dated into something chic. Be creative! 

Best semester wishes from the Reuse Centre! 
Nichole (Volunteer)

Monday, 27 April 2015

Fantastically Fun Reuse Costume and Art Ideas at the Calgary Comic Expo!

I had a blast last week when I went out of town to attend the 10th anniversary Calgary Comic and Entertainment Expo with a few of my friends, my second-ever Expo experience. For anyone unfamiliar with this type of event, it’s about the oddest, geekiest, most unique way to spend a weekend. Thousands of people converge on the Expo grounds over four days to mingle, shop, and interact with some of today’s hottest TV and film actors, industry leaders, and local artisans. It’s also the perfect place to show your love for your favourite characters through cosplay.


Phoenix Scroll Saw Art
Reused and repurposed items may not immediately come to mind when you think of science fiction and comic books, but there are two major ways that I saw reused items represented at this Expo. First, through the art and jewellery crafted by several of the artists. Steampunk aficionados crafted their items from things like old gears, clock hands, aviator goggles and pocket watches, to name a few.
I found art prints of animals made from twigs and leaves, mismatched strips of leather made into cool bracelets and bookmarks, and even Dungeons & Dragons dice upcycled into pendants and bracelets. My best discovery this year was an artist who transforms mundane bits of wood into jaw-dropping works of art with his two hands and a scroll saw. I almost brought home his incredibly detailed "Star Wars X-Wing v. TIE Fighter" vignette, but this elegant wolf’s head stole my heart (as shown in photo).

There was somebody in here!
The second way that items were visibly repurposed or reused at this event was through the cosplayers. At my first Expo, I had a vague notion that some might attend in costume, but I underestimated how passionate people can be. Some cosplayers come in professionally tailored costumes, but I’d say the majority of them seemed to be fashioned from everyday items that inspired individuals imagined as something more. Some of the best things I saw this year were: a Nerf gun painted bronze to be the perfect steampunk accessory; layered strings of pop can tabs made into a surprisingly convincing chainmail; corrugated plastic sheeting shaped just right to become Interstellar’s TARS robot; Queen of Hearts playing cards perfectly embellishing the collar of a Queen of Hearts gown; and a lady Captain America with the iconic shield painted onto her parasol.

I think what I enjoyed most about the Comic Expo was that there was evidence everywhere of what you can create from using your imagination. Just as the sci-fi and fantasy entertainment we celebrate wouldn't exist if someone hadn't dreamed it up, these types of repurposed works of art and cosplay would never be there for us to admire if someone didn't first study an everyday object and think, I wonder what I can do with that!

- Nichole (Volunteer)


Friday, 27 February 2015

February - Reuse-it item: Milk Bottle Caps

There are a variety of fun, creative ways to reuse milk bottle caps. Here are some ideas that our bloggers have come up with. Add your own ideas in our comment section below!

Sarah
This DIY checker set uses lids all of the same colour and puts stickers on them to make two teams, but milk jug lids come in so many fun colours that no decoration is needed. This got me thinking that you could also use milk jug lids as replacement tokens in all kinds of games. Lost a checker piece from an otherwise full set? Substitute a milk jug lid. Not enough poker chips? Milk jug lid. Tiny top hat from your Monopoly game went missing? You guessed it: milk jug lid!

Mallory
As someone with an abundance of lamps without lampshades, finding this little project was almost an act of divine intervention! All you need is milk bottle lids, a needle with some string, and something circular (maybe an old coat hanger bent into a circle?). You can get as creative as you like with different colours hung in patterns or some spray paint for a nice uniform look for a truly personalized work of art and household practicality!

Tamara
Do you like putting up lots of photos, postcards, coupons, etc. on your fridge? A fun way to brighten up the outside of your fridge is to make magnets with plastic milk bottle lids! Just save those lids, wash 'em, buy some magnets and use a glue gun to stick them on!

Another cute idea? Write notes on the lids and pop them in your children's lunch boxes so they'll receive a cheerful message when they eat their lunch at school :)


Lana
This watering can made from a pierced milk jug lid and milk jug is ridiculously simple and also brilliant.  No more uncontrolled glugs from the water bottle for my plants!  Soon they will be showered with gentle droplets. 

Tutorial at A Journey To A Dream 

- Reuse Centre Volunteers

Tuesday, 3 June 2014

Keep your Garden Green: Reusing in your Backyard

It's Spring again (finally!) and that means that across the city, people are getting outside, waking up their yards after a long sleep, and getting ready for the gardening season.

We live in a rough climate, and chances are that your planters, pots, trellises and stakes are all a little worse for wear if you've left them outside over the winter. Garden centres do booming business this time of year, and not just on plants, as folks replace their old containers, tools, and garden decorations.  New items might make our backyards and flowerbeds look beautiful, but with a little creativity, you can have a gorgeous garden for less, AND reduce your environmental impact.

Whether you've got a sprawling backyard or a few manageable pots on your balcony, here are some of my favourite ideas for reuse in your planting spaces this summer:


Get creative with planters.

There is no rule that says you must grow your plants in pots. As a former florist, I can tell you that anything that holds dirt will do, as long as you make a few considerations for plant health. Don't use metals that will rust unless you have a liner in place, and make sure your plants have adequate drainage. This means that if your container doesn't have holes in the bottom, a) make some or b) fill the bottom inch or two with rocks and take care not to over water.

Check out this site for 30 great reuse and DIY planter ideas.

Use found or reused lumber for wood projects.

Want to know how to build this awesome walkway? Check out the tutorial at Funky Junk Interiors.

Pallets are a reuse gardener's best friend. You can make furniture, planters, or use the wood to make fences or square off garden beds. Here in Edmonton, Habitat for Humanity's ReStore is a great place to get re-use or cast-off construction materials.


Make your own garden markers.

From popsicle sticks to venetian blinds, juice can lids to painted stones, there are a ton of ways to make markers for your plants. These are a great way to get the whole family involved in taking care of a home garden.

Check out Housing a Forest's 27 DIY Garden Markers for a list of tutorials.


Don't forget the critters.

You can attract birds and other wildlife to your outdoor spaces with funky, functional feeders and houses. Not only will they make your outdoor spaces look pretty, but attracting wildlife can improve your garden experience by keeping your insect and pest levels down.

Check out these 23 upcycled bird feeder ideas and this list of 20 birdhouse tutorials.

You can also build an easy bee house out of reuse materials. These little houses attract solitary pollinators; these bees will improve your flowerbeds without the aggressive behaviour of hive-bees.

Compost!

This isn't reuse in the way we typically think of it, but composting your organic materials, from veggie peelings and rotten fruit, to kleenex and dryer lint, is one of the best ways that you can reduce your garden's environmental footprint.
Not only will you be returning valuable nutrients to the soil, but you'll eliminate the need to use chemical fertilizers on your plants and produce.

These are just a small number of reuse ideas for your outdoor spaces this summer; the possibilities really are endless. Get creative, and share your favourite ideas for reuse in the garden in the comments below!


-Sarah (Volunteer)

Friday, 25 April 2014

Reusing in Edmonton: Green Window City Project

The Green Window City Project has brought Edmonton artists and business owners together to #rethinkjunk! How? With creative window installations made from reusable, but unwanted, materials. The event officially launched on April 18th with installations brightening several shop windows in Old Strathcona.

Green Window City Project organizer and Reuse Centre volunteer, Kelly Atkinson, may have "made up" the idea of the Green Window City project after getting involved in the Edmonton art scene and the Reuse Centre, but there was a lot of work involved in getting it off the ground. She had to create a dialogue with several Old Strathcona businesses and local artists to ensure their participation. Kelly also pitched her idea to the Awesome Edmonton Foundation and was awarded a small grant to help support the project.

She invited the Reuse Centre blogger team to participate in this recycled art initiative. We got together on Saturday, April 12 to help build an upcycled window installation to be displayed at Old Strathcona Books. Kelly’s vision for our installation was of large block letters, spelling out "WE ♥ YEG , one letter per window, and every letter covered in a different repurposed material from the Reuse Centre.

Finishing off the cardboard letters

So we cut the letters from cardboard then we all played Goldilocks for a few minutes as we browsed the shelves of the Centre for supplies. These shortbread tins are too big. These trophies are too heavy. These packing peanuts could be cool. But this Physics textbook and that smutty romance novel were just right. Back upstairs with our loot, we made a unanimous decision. The front of the block letters would be different, but the back of every letter would be covered in pages from some of the amusing books we found in the store. There were six letters to be decorated and six volunteers, so everyone chooses one. The "Y" was calling to me.
The G is ready! 
My "Y" ended up covered in bits and pieces from the Physics textbook, a Calculus textbook, a Windows '97 manual, a 2003 astrology guide for Aquarius, a directory of hydraulic motors, and choice sections from Blazing Vixen. Feeling impressed with myself, I started browsing the bounty we had brought upstairs for the perfect thing to decorate my letter.

Michelle working on the heart 
I covered my Y with large, multi-coloured, three-dimensional bows that look surprisingly fabulous glued closely together and covering every inch of cardboard. I had never been so proud of something I'd made by hand, and I don't think I'm the only one. Kelly's enthusiasm is so contagious, and we were all excited to be part of something so cool.

The final result, can you guess what we used to decorate the letters?
The installations officially launched on April 18th in Old Strathcona and will end on Sunday, April 27th. Event details can be found on the Green Window City website.  If the project is well-received, Kelly hopes to see Green Window City extend to other neighbourhoods. So show your support for this innovative recycled art project by stopping by this weekend to check out our installation and the 12 others in Old Strathcona!

- Nichole (Volunteer)