Friday, 18 December 2015

Anything but Christmas Trees

Reuse-friendly Alternatives for a Different Kind of Christmas Tree

'Tis the season for retail marketing to challenge the concept of the traditional evergreen conifer tree. Why must they have all the fun?  Let's do our own mind exercise, and let's rethink and tinker.

In all its essence, the Christmas Tree is roughly triangular, conical, or pyramid shaped and it is meant to bring joy and cheer.  Simple!  This leaves so much opportunity to stretch our creative muscles and make our own beautiful, personal 'tree'.  Not everyone has the space or budget for a large tree, so this is also a nice reminder that there will always be a way to celebrate.

Before we run too wild, there are some key things to note. SAFETY FIRST!  Please make sure bulbs, lights and wires are not frayed and are rated for indoor use.  When designing your new festive tree, please consider fire hazards, weight distribution, load considerations, and the unpredictability/predictability of pets and kids.

You don't necessarily need to buy brand new supplies, but instead you can pull things from around the house to create a festive look and then return them back to their shelves after the holidays.  Consider giving some home staples a second purpose, rather than hiding your decorations away in a box for the rest of the year.  The Reuse Centre also has lots great supplies you could use.

Here are a few ideas I've come across:

- Siao (Volunteer)

Friday, 11 December 2015

Reuse Wreath Making Party

A few times a year, our volunteer blog team gets together for a reuse craft night. We've made Easter bonnets, glitter houses, and our awesome We Love YEG sign, originally made for the Green Window City project.

On a chilly evening in late November, we decided to tackle wreaths! First, we grabbed a pile of holiday decorations, garland, ribbon, wreaths, and wreath forms to use. Then, we took a snack break while we waited for the glue guns to heat up!

Part of our wreath-making stash. 
We had pre-made artificial wreaths on hand that we could have decorated, but everyone decided to start from scratch. Some of us jumped in, while others were a little overwhelmed by the possibilities! Nichole hit Pinterest, her favourite craft muse, for some inspiration. Lana tried to choose between the two ideas she'd thought up beforehand.

Soon, even the hesitant among us were off and running! We spent the next two hours crafting, chatting, snacking, and listening to alt rock music because Sarah couldn't find the holiday radio station.

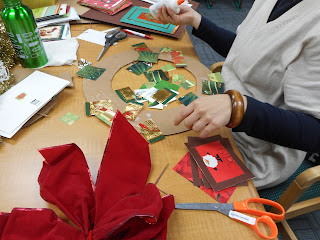
Lana came armed with a great idea to reuse old holiday cards.
If there is anything we've learned through the Reuse Centre, it's that paper towel rolls can be used to make ANYTHING! We were all eager to see what Nichole had up her sleeve.
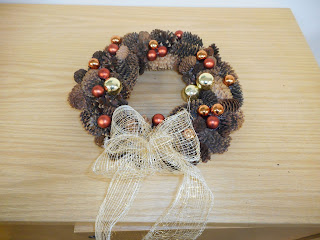
Sarah began gluing pine cones to a styrofoam circle. After poking herself several times with her spiny material choice, she had a respectable wreath!
Tamara wielded her glue gun like a pro, to secure this string of classic wooden beads.
 With the variety of materials at our disposal, the possibilities really were endless. We all chose really different items and wreath styles, and ended up with 4 unique creations.

Nichole made this minimalist beauty out of paper towel rolls! She cut them up and glued them into 5-pointed flower shapes, then glued all of her flowers together to make a circle. To add a festive touch, she glued on some sprigs of fake red berries.

Sarah finished off her rustic wreath by adding some small ornaments and a bow made from netting.

Tamara made this glittery treasure out of two skinny, willow-twig wreath forms. She tied them together to create a fuller base, and wrapped it with wooden beads and garland. Then she decorated it with bows, fake poinsettias, and gold ornaments.

Lana made this fun, colourful wreath out of old holiday cards! She cut a variety of cards into small squares, and glued them to a large cardboard circle she'd made. The three "photo" frames are made from card stock. They each contain a pretty picture from a card, but the tops are open so the images can be easily changed to other cards, or to family photos.

We can't believe how awesome these turned out, and how easy they all were to make! These projects are just a small sampling of what's possible with some old holiday items and a little creativity. Take a look around your house, and see what you can come up with!

- Sarah (Staff)

-All photos taken by Reuse Centre Staff

Tuesday, 1 December 2015

Pinterest 101

Pinterest is a well known social media platform that can be used by anybody. You may be an artist trying to showcase your work or looking for new ideas on how to build a business empire. You may be a hobbyist or artist in search of new project ideas or solutions.

Pinterest is mentioned often on this blog. It's a great resource for finding creative reuse ideas, but it can be intimidating for those who've never used it.

Welcome to Pinterest 101!


I should warn you, you may become addicted instantly!

I think of Pinterest like a giant scrapbook that allows me to keep all the ideas, recipes, and DIYs that I want to do in the future, in one place. This virtual scrapbook is easily organized so that with just a few clicks, I can find what I was looking at months ago. 

Pinterest is different from your regular internet bookmarks bar, because it allows you to attach photos and descriptions for quick reference. It is also shared on the internet, so you can see what other people have saved as well.

Did you know that the City of Edmonton is on Pinterest? There's even a Reuse Centre ideas board.


Setting Up Your Account


Your home feed will look something like this.
After you have signed up for an account, you will see a couple of things on the home page. There is a search bar at the top, your profile name to the top right, and tons of 'pins' below. This is called your 'home feed'.


In the top right, beside your name, you will see 2 thumb tacks that are a mirror image inside a grey icon. Click on that and you will find 3 tabs:

Find this icon on the far right, at the top of your page.
News is an update of what the people you follow pin, follow or like.

You updates you if people pinned or liked your pin. 

Messages is where you can view messages and pins that are sent to you from Pinterest friends and followers.


Building Your Pin Collection


Pins are typically made up of an image, captioned with text and linked to a website. The more boards you follow, the more pins will show up on your home feed.

A pin from the Reuse Centre board.
Sometimes you will see pins on your feed that Pinterest picked for you. Pinterest recommends other pins for you to view, based on the types of boards you follow, and the things you pin. You can also use the search bar to find pins related to a particular project or idea.

Clicking the Pinterest logo on the left will refresh your home feed. Clicking the button showing 3 horizontal bars
(on the right of the search bar) will open up a list of popular search options.

You can do 3 things when you hover on top of a pin with your mouse cursor.

1) Pin it. You can pin a pin on any board you have created. Title your boards to help you stay organized by topic. You might want separate boards for art, fashion, holidays or fitness.

2) Like it. You can 'like' by clicking the heart button, before you pin. This is especially handy if you don't have a suitable board to put it on yet, or maybe you didn't have time to fully read the pin. Sometimes the image can be deceiving and the pin's content doesn't match what you expected to see.

Here's a tip: I recommend not pinning everything you see that you kind of like! I often catch myself on Pinterest showing an interest in everything, and I just want to keep all this information forever without hesitation! Being selective with what I actually pin helps me to know that I saved a post with relevant and proper information.

3) Send it. You can share interesting pins with your friends who are on Pinterest, or send an email to those who aren't.

Staying Organized


Boards are where your pins are organized. Pretty simple and realistic! It's just like a virtual bulletin board.

You have the option to create both regular and secret boards. Regular boards can be seen and followed by anyone. Secret boards can be seen only by you and friends you have authorized. You cannot change this preference later on. Once a secret board, always a secret board.

After you title a board, you have the option to give it a description, give it a cover photo/pin (large image on board), categorize the board for others to search it, and even to allow other followers to collaborate with you on the board. This option is great for people who are working on a project together.

View your boards, or create new ones, by clicking on your name at the top right of your screen.

This is a basic tutorial, but you can reference help.pinterest.com for any questions you may have. You can even search for Pinterest tips and tricks in the Pinterest search bar. It sounds silly, but can be really useful!

I use Pinterest to organize ideas from other reusers from all over the world. I have a do-it-yourself (DIY) board, a home inspiration board, and a things to try board. I find myself looking over these ideas all the time and trying them when I feel inspired!

Enjoy Pinterest and all that it has to offer!


- Michelle (Volunteer)
with additional information and edits by staff

Screencaptures of Pinterest.com taken by Michelle and Reuse Centre staff

Thursday, 26 November 2015

Novmber Reuse-it Item: Disposable Cutlery

Plastic cutlery: what do you do with it after you've used it? Resist the urge to chuck it in the garbage! Wash and reuse as-is, or try one of the fantastic ideas that our blogger team has gathered from the web.


Mallory
A few years ago I stumbled upon a lampshade made of plastic spoons, and absolutely loved the idea. Here is a way to reuse something designed to be clearly "disposable", and change its purpose entirely so that you could put it up for display in your house. 

As a pineapple fanatic, I am ecstatic about this idea  and can't wait to try it myself! All you need is a mold (balloon, large jar, etc.), plastic disposable spoons, scissors, and a hot glue gun. Then you're good to go!

Nichole
If someone had told me they made a mirror out of hot glue and plastic spoons, this is definitely not what I would have pictured! I am crazy about these chrysanthemum mirrors, which you can paint any colour to suit your needs. I'm in love with the cherry red on white shown in the picture, but I'm envisioning a mirror like this in jewel tones over a bedside table or makeup vanity. You can get free instructions for this particular mirror on UsefulDIY.com, but I also found a wealth of great examples on Pinterest.

Siao

Sculptures don't necessarily need to be heavy or costly to display in your own home. Although the dragon featured by RuthAnn below is indeed intriguing, if you are more like me, there are simpler and still beautiful sculptures to try, such as this pear.
 

RuthAnn

Most of us probably don't have time or the patience to turn our excess plastic cutlery into exotic art such as this dragon, but what a showstopper!
 
One of my favourite uses for disposable cutlery is to reuse them as small garden stakes when I am planting my seedlings. I use the forks to hold the seed packets, and I often just write on the knives and spoons. 


-Reuse Centre Volunteers

Friday, 13 November 2015

Throw a Travel-Themed Party on a Budget with the Reuse Centre


Planning an event and short on cash for decorations? No problem! You can pull together some travel-themed party decorations with a little bit of crafting and some of the awesome resources from the Reuse Centre.

For this event, I decided to make wall decorations, a banner and a travel-themed signpost. I also printed and cut out “passports” that served as the door prize entries. I’ve also seen similar passport-style invitations and place cards for weddings.

The banner:

  1.  First, I collected a stack of old maps from the Reuse Centre. These had fallen out of some donated National Geographic magazines. I also grabbed some poster board remnants and some leftover tissue paper (to be used for wall decorations later).
  2. Using a standard word processing program, I printed out the letters I would need for my banner—one letter per 8.5x11 page—and cut them out.
  3. I traced these letters onto the maps (varying the colours and types of maps) and cut them out.
  4. I glued the map letters onto poster board and cut these out as well.
  5. Once I had all my letters, I laid them out face down on the floor in order, careful to get the spacing and alignment right. I used the grooves in my wood floor as my guides.
  6. Next, I stretched two lengths of monofilament (fishing line) over each set of letters (I created my banner in two sections, to hang one above the other). I taped the monofilament down to the floor.
  7. Using a glue gun, I attached the monofilament to each letter.
  8. I hung my new banner! It may shift or drape when you hang it. Gently pull it taut to straighten it out.

Voila!

The wall decorations (seen above and in the image below):

  1. I started by selecting travel-themed graphics from a simple Google search.
  2. I printed the images onto paper and cut them out to create basic shapes
  3. Like the letters, I traced these onto maps and cut out out the outlines. For the moment, I left the interior cuts (e.g. the car windows) alone.
  4. I glued the shapes to poster board and cut them out. The board made the images more stable. I used a craft knife to cut out the interior shapes for those images that had them.
  5. I cut small pieces of coloured tissue paper and glued them to the back of the shapes with interior openings to create a “stained glass” effect.

Here are some of the other shapes I made.
To fill in blank wall space, I hung up all of the extra maps.
The signpost:
For the arrows, I used an old pack of wooden stakes that I hadn’t gotten around to using in my garden. For the post, I used a scrap piece of 2x2" lumber. Rather than building a support for the bottom, I opted to put the post into an old Christmas tree stand, disguised with a piece of scrap black fabric.
1.       Paint the post and stakes your desired colours.
2.       Choose locations that are relevant to your event or theme. Use Google Maps to find out the distances from where you are.
3.       Paint the locations and distances on the stakes in the correct directions.
4.       Pre-drill each stake for two screws (to avoid splitting the wood) and then screw each stake to the post. I opted to put stakes on all four sides, but you could easily do one or two only.
5.       Set the post in the Christmas tree stand and straighten it. Tighten the screws and cover the stand with fabric.
Where's your next destination?

Bon voyage!!

- RuthAnn (volunteer)

All photos provided by RuthAnn

Friday, 30 October 2015

October Reuse-It Item: Crayons

The Reuse Centre accepts crayons of all shapes, sizes, and colours. We'll take them new, used, and even broken! This month, our blogger volunteers have come up with a list of great ways to use up those old crayon stubs and pieces, that might not be great for colouring anymore.

This box of nearly-new crayons was donated to the Reuse Centre!

Michelle

Do you love Play-Doh®? I love Play-Doh®!

Here is an easy tutorial you can follow to make Play-Doh®-style putty at home, in all the colours of the rainbow.

All you need are crayon pieces and a couple of common kitchen ingredients to make this simple recipe. It's perfect for playing!

Get the tutorial at sugaraunts.com.

Nichole

I loved to colour when I was a kid, but as soon as the crayons became too short for me to sharpen I would always just toss them away. This craft uses all of the crayon nubbins earmarked for the garbage bin, and makes unique ornaments that you could use on your Christmas tree, or as that pop of colour in your home decorating!

The instructions, from the blog Living, Loving, Laughing & Creating Everyday, seem pretty simple: take the top off of a clear ornament ball, place a few crayon pieces inside, put the top back on and heat gently with a hair dryer until the pieces melt, swirling so the wax spreads around. Be careful - it sounds like it could get a little hot, but the results are worth it!

Tamara

Crayons are lots of fun, but when they inevitably get broken and stubby, what can you do with them? A practical reuse idea for crayons is to make a candle out of the pieces.

Other than soy wax (unless you're already a candle maker extraordinaire), chances are you already have most of the items you need at home. Check out the full instructions here.

Who doesn't love candles? They're so colorful, too! Enjoy!

Siao

The days are getting shorter and the nights are getting longer, so let's brighten up the place with colour and illumination!  This is a simple idea, with great results. Use leftover crayons to scribble on white paper bags. To melt the crayon, set a piece of parchment paper on top of the bag and iron it. This blends and swirls the colours.  

Punch holes throughout the paper bag to allow more light to flow, and then place a small tea light candle inside a plastic cup or glass holder inside the paper bags. If you're concerned about fire safety, you could also use a battery powered faux candle.

Get the full set of instructions at Aunt Peaches.

RuthAnn

My good friend Patti received this lovely handmade picture, made with crayons, for her birthday.

Make your own gorgeous artwork by melting crayons!
Image provided by RuthAnn.
Here's how her friend, Tammi, made it!

Materials needed:
Canvas
Crayons (this project used the equivalent of two boxes)
GOOP® (or another industrial adhesive; glue does not work)
Hair dryer

Set the canvas up at the angle you want your colours to run. The process is messy, so be sure to put a drop cloth underneath your project.

Use the GOOP® to adhere the crayons to the top of the canvas. You can peel the labels off of the crayons if you want to, but it's not necessary. Use the hair dryer to melt the crayons. It takes a few minutes to get going, but once they start to drip, it goes quickly. Angle the hairdryer in the directions that you want the wax to run, to blend colours.

Choose the image you want for your silhouette. For this project, Tammi combined two images (Eeyore and an umbrella). Glue your image to black card stock, trace, and cut it out. Remember that your image will be reversed when completed, since you flip it over to use the black side. Before sticking it down, make sure it is facing the way you want the final product to appear. Use goop to adhere the image to the canvas, and voila!

Tuesday, 27 October 2015

DIY Halloween Deadcorating

As an adult, I think I'm more excited about Halloween than I ever was when I was a kid. When you're little, you're mostly in it for the candy. When you're grown, you get to make your house look super creepy and then invite all of your friends over for an awesome party!

Store bought Halloween decorations can get pricey, and most of them have a definite "store bought" quality to them that can ruin the creepy effect you're probably going for. I found some great DIY "deadcorating" ideas to give your place that ghoulish, unsettling vibe this Halloween.


Paint It Black
Paint makes everything better...and black paint makes everything creepy! Those little porcelain jugs and figurines found in every thrift shop and your grandma's basement become decidedly sinister with a coat of black spray paint. Use them as delightfully macabre centerpieces on your snack table, or place them anywhere in your home where your guests might end up. The black really lends itself to Halloween, but these painted jugs or figurines look so sleek that you could use them year round.

Fake Flowers Are Your Friends
Found in any craft or thrift store, fake flowers come in a wide range of colours that can cheer up any room or project. That simply won't do for your Halloween decorations, but it's nothing your trusty black spray paint can't fix.

Besides giving your home that deathly quality, fake flowers also give you the opportunity to put together some truly unsettling arrangements, like eyeball flowers! Inspire nightmares by gluing fake eyeballs into the middles of fake flowers. Might I suggest you then place them inside your painted jugs?


Turn Everyone Arachnophobic
No Halloween is complete without creepy crawlies, and these DIY projects don't disappoint. If you can get your hands on a few pairs of stockings, you can make some really awesome hanging decorations for your yard, or to suspend from the ceiling in your party zone.

One great idea that I came across requires a stocking, a balloon, and a glow stick. Put 'em all together and you get this really great ethereal effect that looks like ghosts, or spider eggs, or maybe even glowing brains.

If you're looking for more of a classic, spidery display, a stocking filled with cotton balls or stuffing and covered in fake spiders will do nicely. If you're worried your guests might leave without developing a lifelong phobia, try hanging a few spiders from the "egg sacks" with thread or dental floss.


Private Eyes Are Watching You
Toilet paper rolls, a box cutter, and glow sticks are all you need to unsettle your guests and neighbourhood trick-or-treaters at your doorstep. Place these glowing eyes in unexpected places around your yard, or even in your home (bathroom, pantry, coat closet, etc.), and see how many people notice they're being quietly watched.

Happy Halloween, from the Reuse Centre!

-Nichole (Volunteer)

Wednesday, 21 October 2015

Magazine Strip Silhouette Art

This summer felt like it stampeded by, so it was particularly nice to have a free Saturday morning! I ended up blocking it off for a fun project with friends which included coffee, craft therapy, and grownup talk.  The project at hand was to make magazine strip silhouettes, and my goal was to make it simple, modern, and a fun distraction from our routine troubles.

Step One: Print Stencil/Silhouette
In preparation for this project, you'll need to choose your images. We found stencils and silhouettes online, then resized them to print onto a full letter sized page.  Images with more surface areas are ideal. For more intricate images, like the zebra, fish or raccoon-Mario, an alternative is to use the magazine strips for the background, rather than for the silhouette itself. (You'll see what I mean later!)

We had a wide variety of images to work with!

Our magazine stash.

Step Two: Choose Colourful Magazine Pages
Pull out pages with a lot of colour or intricate patterns, which will make the silhouette look fuller.  Try to choose pages with colours that will contrast with the background paper you intend to use.

It's okay to have some pages with words or body parts, since these won't be very noticeable in the cut strips. 


Step Three: Cut Strips from Magazine Pages
Fold the magazine pages accordion-style to create nice, straight cutting lines that are the same distance apart. Alternately, you can use a ruler and draw cutting lines. Note that the thinner the strips, the more gluing you will have to do.

Cutting the strips takes patience, but it's worth it!
Be very careful to cut as straight as you can, because it will help when pasting the strips side-by-side. While cutting, my friend came up with an ingenious plan to use a shredder.  Try it out and let me know!


Paste strips on the back
of a printed page.
Step Four: Glue Magazine Strips to the Back
The fun part! Paste the strips as you please on the backside of the stencil pages. The pattern is up to you. We alternated a variety of strips of different colours to make a rainbow effect.  I have seen some projects done with gradients of the same colour, which has a desirable look as well.

Keep in mind that the strips only need to cover the image, so you don't necessarily have to cover the entire page.  Rotate and place magazine strips strategically, depending on where the image cutout will be.  Some of the strips won't be cut perfectly straight, so just overlay them to ensure no blank spaces are showing.

Step Five: Cut out Silhouette and Paste Striped Silhouette onto Paper
Depending on the silhouette, you can also turn the original cut sheet into a second art piece, as with the deer silhouette shown below. As I mentioned earlier, this would work really well for more intricate images like the zebra.

The negative space inside the remaining magazine strips still looks neat! 
Cut-out striped silhouette.
Left, we have the striped silhouette on coloured paper, and on the
right, the leftover striped background over coloured paper.
Step Six: Enjoy Finished Art Piece! Frame and Gift at Your Leisure.
I'm really glad that this turned out so well!  We were really worried that this would turn out to be a pinterest fail moment.  I still have tons of magazines left over, so I will have to come up with another craft therapy session soon!
Our finished silhouettes, ready for display.

- Siao (Volunteer)

All photos provided by Siao.

Thursday, 8 October 2015

5 Ways to Reuse your Turkey Dinner

Did you know that Canadians wasted approximately $31 billion worth of food last year? Almost half of that was consumer waste - Canadian families throwing food in the garbage.

How are we faring in Edmonton? Approximately 23% of the garbage produced by Edmontonians in 2013 was food waste. This means that almost a quarter of our garbage is something that could have been eaten. Even more distressing, some of what we throw away is still perfectly edible, in original packaging and within the expiry dates.

This weekend, many of us will be enjoying Thanksgiving with friends and family. If your family is anything like mine, Thanksgiving means food. A big turkey in the oven, a huge pot of mashed potatoes, stuffing, biscuits, veggies galore, and of course a choice of pies for dessert!

We always make too much, and so do most people we know. So with that in mind, here are 5 simple ways to reduce waste and "reuse" your turkey dinner!

Meal Plan with Leftovers
One of the best parts about a big holiday meal is the leftovers. Too often, we pack things into the fridge and forget about them. Or we get sick of them, day after day.

Make a plan for your leftovers, so you don't find yourself dumping food into the garbage a week down the road. Too many mashed potatoes? Try making latkes or use them to top a shepherd's pie. For a double leftover-busting whammy, replace the ground beef in that pie with your leftover turkey!

Soup Stock
Homemade soup stock is incredibly easy to make, cheap, and usually much healthier than store bought varieties. Simply throw your whole turkey carcass (bones, skin, fat, it's all good!) into a pot with onions, garlic, and unwanted, leftover vegetables.

Did you know that vegetable peels are rich in nutrients? Throw those (washed) carrot and potato peels, zuchini ends, and corn cobs in there, too, stems and all. Season with a bit of salt, pepper, thyme, sage, whatever smells good!
Image Source: Me! For my next trick, I'll transform this....to this!

Cover with water and let simmer on the stove (1-2 hours) or in a crock pot (4-8+ hours). Strain the solids out, and you're done! Broth will last for a few days in the fridge, or you can freeze it in smaller portions to use later.

I keep a running "soup sack" in my freezer. Every time we peel veggies, find limp celery in the bottom of the crisper, or cook anything with a bone, it goes into a freezer bag. When the bag is full, the contents go into the crock pot and out comes broth!

Gravy Cubes
Gravy freezes really well! Pour your leftover gravy into ice cube trays, freeze, and then store the gravy cubes in a container in your freezer. Toss them into stir fries and other recipes as you cook, to add a bit of flavour.

Recipe-Ready Turkey
No matter how much we try, we are always faced with a last bit of turkey that really shouldn't sit in the fridge much longer. Are you noticing a theme yet? I put it in my freezer! This turkey is pre-cooked and chopped, so I can pull out as much or as little as I need for a recipe that's going to get eaten right away. I throw it, still frozen, into stir fries, add it to rice, or into a container with some veggies for lunch at work.

Pie Casserole
This doesn't usually happen in my house, but apparently some people end up with leftover pie. Yep, there's a use for that, too. I might have to hoard some extra pie this year, so I can try this delicious looking pumpkin pie breakfast casserole.

These are just a few ways to reduce food waste around the holidays. If you have other ideas, we'd love to hear them! Please share your tips and tricks in the comments.

-Sarah (Staff)


Wednesday, 30 September 2015

September Reuse-It Item: Jars

Here at the Reuse Centre, we accept mason jars and baby food jars. They're great for canning, making preserves, storing food or small items, and home organization. This month, our blogger team has shared some other fun and useful ways to reuse old glass jars!

Michelle

Here is a tutorial I found a few months ago that teaches you how to turn your mason jar into a sippy cup.

For a special touch, you can also use chalkboard paint to make a label area. Nobody will get their cups mixed up at your next party!

Check it out at Instructables.

Siao

Old jars, new lids! Just top the old lids with figurines or plastic animals.  All you need are some solid paint and strong glue to create this refreshed look.  The jar maintains its function, but the new lid adds a pop of colour and personality.

These is great for party favours, kids' storage, and general modern décor.  Looking for some cute topper combinations? Try rabbits for Easter chocolate jars, a nutcracker for nuts, cats or dogs for pet treats, a bride and groom for wedding favours, and lego men for organizing building blocks.

See the instructions at Paris Bourke.

Emma

I love to make mini pin cushion and pin jars from baby food jars. They make a great little stocking stuffer for sewists and other crafty people, and they are so cute. There are many different methods to make these, but PrettyPrudent.com has a quick, easy to follow tutorial.

Tamara

One of my favourite foods is jam. Homemade jam is even better. Glass jars are perfect to store jam, and reuse over and over again, because who would ever get sick of jam? Glass jars are also great for storing a variety of items, or food that doesn't spoil (e.g. sugar and spices).

I've also used jars for decoration. When I first moved into my place, I didn't have any vases for flowers so I just used jars instead. I liked the look so much that I decorated with various assortments of jars and fake flowers. This blogger spray painted her glass jars and the outcome is awesome!

Lana

Autumn, while beautiful, makes me a bit sad because it reminds me of the winter that's coming.

Here's a way to save a little of the lush greenery of summer indoors, by making a glass jar terrarium!

Makezine  and Design Sponge give the basics on just what to do. I can't wait to customize my own!

Friday, 25 September 2015

ReStore - Reducing Waste with Habitat for Humanity

When we moved three years ago, our semi-new couch couldn't fit through the door.  It sat in the garage for a whole year, reminding us of our poor planning and unfortunate waste of a good piece of furniture - but wait!  Just like an unused craft kit is happily accepted at the Reuse Centre, gently used furniture is welcomed at Habitat for Humanity's ReStore!  I called for a pick up and that was that.

Welcome to the ReStore!
I thought very little of the ReStore again until several months ago, when my neighbour started developing her basement.  Costs for all-new building materials were outside her budget, but she knew about the ReStore's other side. They offer reasonably priced building materials. Together, we went for a visit.

The ReStore North location is a medium-sized warehouse. I expected to find a lot of furniture, but it couches, tables, and chairs actually took up very little of the floor space.  Instead there were pallets and shelves full of tile, carpet, hinges, and screws.  There was also an area for light fixtures, sinks, and kitchen cabinets.

Look at all of that flooring!
I learned that the ReStore is "a retail outlet that sells new and gently used building materials and home improvement items".  The stock is made up completely of donations from individuals and businesses. Also, like the Reuse Centre, they promote waste reduction through reuse. Since opening in 2000, they have diverted "over 12,000 tons  of reusable and resalable items from local landfills."

My neighbour found carpet and underlay for less than half the price of new materials(likely a donation from a building site, where the end of roll wasn't usable).  I eyed kitchen cabinets that I later learned may have been part of their Kitchen Salvage Program, which enables residents to donate their whole kitchens before renovations.  

Need new baseboards or wainscoting? I found plenty!
A kitchen reno is probably quite a few years away for me, but in the meantime I'll definitely look to ReStore for any of my future home improvement project supplies.  Aside from the cost savings, I'll know my purchases will help reduce landfill waste and support a good cause.  

All proceeds from ReStore fund Habitat for Humanity's administration costs. This means that every dollar donated directly to Habitat for Humanity goes directly to building homes and serving families.

Read more about Habitat for Humanity here


- Lana (Volunteer)

All photos taken by Lana and published with permission of Habitat for Humanity Edmonton.

Friday, 18 September 2015

Dorm Room Decorating on a Budget

When you're a university student living at home, you can still comfort yourself at the end of a tough day with familiar items and surroundings. When you're a student living in 'res', you may be lucky enough to bring a few of your familiar things into an otherwise soulless room that you may or may not be sharing. Even worse, you're probably also completely broke. 

Don't despair! There are a ton of ways to jeuje up your dorm room, organize yourself for school on a tight budget, and still have plenty of money left over for ramen noodles and beer. Some projects can be done with items you might already have or could borrow, and others could be done for a $5 shopping spree at the Reuse Centre. 

I'd like to share a few of my favourite budget projects for personalizing your dorm space and staying on top of school projects.

 DIY Dry Erase

Papers and exams can overwhelm you if you don't stay organized from the start. I always made sure to grab a free agenda during the first week of school, but I also liked having a wall calendar handy to help me plan a month ahead of time. Calendars can be pricey, but if you can pick up free paint chips at a hardware store or the Reuse Centre, a frame from your parents/Reuse Centre/dollar store, and a whiteboard marker, you can make a dry erase calendar to get you through the semester. Bonus points for giving your drab dorm room a punch of colour. Check out DIY Projects for inspiration.

Don't need a calendar? Instead of paint chips, fill the frame with a bit of gift wrap or scrapbook paper. Now you've got a super cheap dry erase board to leave reminders for yourself, or angry notes for your roommate.

Desk Organizers
When you only have so much space, it's really easy to clutter it up and make a big mess. Closets can quickly get out of hand, and course handouts can get lost in the ever-growing piles of paper. Help yourself stay organized with upcycled wicker baskets! Grab some old, outdated styles for cheap. They might be hideous under normal circumstances, but covered in a coat of metallic or bright-coloured paint, they will breathe life into your room and tame your mess. These beauties can become your new T-shirt baskets, paper trays, and pencil cups. If your grandmother doesn't have any, thrift stores and the Reuse Centre certainly will. 

Transform cereal boxes into attractive and useful organizers with a box cutter, your favourite fabric, gift wrap or magazine cutouts, and some tape. Use them for your paperwork, organizing your makeup, storing your hair appliances... Whatever you need! 


Closet Space Savers
This has to be about the easiest possible way to maximize your dorm room's non-existent closet space. Remove the tab from a pop can, loop one end over one hanger, and a second hanger through the other end. Voila! You've doubled your storage space and now you can keep outfits together. You can probably assemble enough pop can tabs for this in an afternoon if you recruit your friends. 

Another inexpensive space saver is to add shower curtain rings to a hanger, to keep all of your smaller items in one place. Belts, scarves, tank tops, you name it! If you're a purse junkie, you can also store them this way. Try your nearest dollar store or second hand shop for shower curtain rings, and make sure your hanger is sturdy. 

Of course, this is just a sampling of some of the easiest ways to personalize and organize your dorm space on a small budget. The Reuse Centre, your closest dollar store, and your parents' basement can hold a wealth of items to accessorize your student life, and a spot of paint can do wonders to turn something dated into something chic. Be creative! 

Best semester wishes from the Reuse Centre! 
Nichole (Volunteer)

Friday, 11 September 2015

Book Review: Reuse Crafting Edition


I spend more time on websites like Pinterest than I'd care to admit, looking up interesting DIY projects and home decor ideas, yet invariably ending up on boards about cats. I sometimes need reminders that there are these things called books that are also excellent sources of information and ideas on all kind of subjects, including reusing and repurposing everyday items. I recently made a trip to my neighbourhood library, where I found a treasure trove of craft books that feature ideas to make use of everything from empty cereal boxes to wooden pallets. I'd like to tell you about three books, presented here from most to least helpful, for an inexperienced crafter.

The most helpful book of my recent haul is Create, Update, Remake (Transcontinental Books, 2011), from the editors of Canadian Living. Some of the projects which require sewing or knitting are, frankly, beyond the scope of my abilities. However, this book also has some completely simple craft ideas that are suitable even for children, like turning ugly ties into tea cozies, or salvaging the back pockets of worn-out jeans to make a wall organizer. Every craft is accompanied by detailed instructions, and some of the more complicated projects, like wooden bird feeders and window boxes, have additional diagrams in the back. I'm definitely going to be trying my two favourite projects: turning an old china cup and saucer into an elegant bird feeder (p.78); and making wastepaper baskets out of actual waste paper (p.153).

Another helpful find, if a little more geared towards an experienced crafter, is Eco-Chic Home (Skipstone, 2010) by Emily Anderson. One thing I really appreciate about this book is the comprehensive introduction on rethinking how we relate to materials generally considered disposable, and where we can find these items outside of our own homes, such as estate sales and even school libraries (neither of which, I confess, had ever occurred to me before). Every craft is accompanied by wonderfully detailed instructions, which will make projects like the braided t-shirt rug (p.57) that I’ve always wanted to try so much more possible. The helpful instructions even make some of the more complicated projects, like reupholstering chairs, seem less daunting. My biggest problem with this book is that the photography is beautiful, but about fifteen percent of the projects have no pictures, which means that if you’re interested in making them, you have no examples of how it’s supposed to turn out.

Finally, the least helpful book that I brought home is Remake, Restyle, Reuse (Watson-Guptill, 2006) by Sonia Lucano. I should clarify that an inexperienced crafter, such as myself, is kind of out-classed by the skill required for most of these projects. Like Eco-Chic Home, the photography is quite stunning, and every craft is followed by specific instructions. Unlike the other two books, certain projects in Remake, such as the admittedly cool geometric carafe (p. 21), require the use of things like glass engraving tools, which are not readily available or simple to use. Other crafts, like the spring-inspired pillowcases (p.55), require only fabric paint, tracing paper and a steady hand, none of which I possess, but could more reasonably acquire. Overall, I thought this book had some truly beautiful ideas for breathing new life into old things, but they just seem a little too daunting to attempt for a crafter of my skill-level.

All in all, it's important that you find a book that's right for you. A simple book provides no challenge for an experienced crafter, and a difficult book might scare away a newbie before they've even really begun. For my lackluster crafting talent, the books with big pictures and ludicrously simple directions work best. As soon as I read words like "engraving tools" and "turpentine", I start wondering where I can just buy the finished project, which rather defeats the purpose.

- Nichole (Volunteer)