Showing posts with label Craft. Show all posts

Wednesday, 30 September 2015

September Reuse-It Item: Jars

Here at the Reuse Centre, we accept mason jars and baby food jars. They're great for canning, making preserves, storing food or small items, and home organization. This month, our blogger team has shared some other fun and useful ways to reuse old glass jars!

Michelle

Here is a tutorial I found a few months ago that teaches you how to turn your mason jar into a sippy cup.

For a special touch, you can also use chalkboard paint to make a label area. Nobody will get their cups mixed up at your next party!

Check it out at Instructables.

Siao

Old jars, new lids! Just top the old lids with figurines or plastic animals.  All you need are some solid paint and strong glue to create this refreshed look.  The jar maintains its function, but the new lid adds a pop of colour and personality.

These is great for party favours, kids' storage, and general modern décor.  Looking for some cute topper combinations? Try rabbits for Easter chocolate jars, a nutcracker for nuts, cats or dogs for pet treats, a bride and groom for wedding favours, and lego men for organizing building blocks.

See the instructions at Paris Bourke.

Emma

I love to make mini pin cushion and pin jars from baby food jars. They make a great little stocking stuffer for sewists and other crafty people, and they are so cute. There are many different methods to make these, but PrettyPrudent.com has a quick, easy to follow tutorial.

Tamara

One of my favourite foods is jam. Homemade jam is even better. Glass jars are perfect to store jam, and reuse over and over again, because who would ever get sick of jam? Glass jars are also great for storing a variety of items, or food that doesn't spoil (e.g. sugar and spices).

I've also used jars for decoration. When I first moved into my place, I didn't have any vases for flowers so I just used jars instead. I liked the look so much that I decorated with various assortments of jars and fake flowers. This blogger spray painted her glass jars and the outcome is awesome!

Lana

Autumn, while beautiful, makes me a bit sad because it reminds me of the winter that's coming.

Here's a way to save a little of the lush greenery of summer indoors, by making a glass jar terrarium!

Makezine  and Design Sponge give the basics on just what to do. I can't wait to customize my own!

Tuesday, 16 June 2015

New Idea Cards Inspire Reuse Centre Customers

CD/DVD Picture Frame
You may often find yourself wondering exactly how some of the items at the Reuse Centre can be reused or repurposed. Luckily for our customers, the staff have come up with the solution of putting up idea cards throughout the store!
Customer curiosity was what motivated the Reuse Centre Coordinator, Kristin, to create idea cards and place them around the store.  People shopping or donating would often exclaim that they would have no idea what to do with things like bread bag tags or empty CD and DVD cases. Therefore, the idea cards seemed like an excellent way to reach out to the public and fulfill the Centre’s goal to educate people about a variety of creative and very useful ways to reuse different items.

Stamps Photo Frame
Idea cards are placed throughout the aisles and offer suggestions on a wide variety of crafts and DIY projects on how to reuse the items we sell. Each colorful card shows a picture example of the craft or project, with a list of materials and a link to a website with instructions or a tutorial.
So far, the staff have received positive feedback about the Idea Cards, and we have also noticed customers browsing through them while they shop. Even our younger customers love to take a look at fun crafts they can create with the items.


Paper Plate Dream Catcher
Given the positive responses from customers, staff are looking at using different methods to promote reuse of our items around the store. One idea we would like to try is a more prominent display of ideas on the wall for more people to see. Another exciting possibility is to compile and display a collection of submissions from the public on the projects they have completed with items from the Reuse Centre. 

Next time you visit, keep an eye out for the Idea Cards and be inspired to create something new with your next purchase of reuse items! Share the way you reuse our items below!

- Lynnette (Staff)

Tuesday, 9 September 2014

August Reuse-It Item: Paint Swatches

Anyone who's ever done a big painting project knows that it's easy to accumulate a ton of those paper swatches, fast! Ecru vs. Eggshell, and oh, this brand's Forest Green looks just a tad darker than that brand's Evergreen. Whether your project is big or small, it's important to get the colour just right, so those little swatches come in handy! There's no denying that they're useful, but what do you do with them after you've made your choices?

If you're like many Edmontonians, you bring them to the Reuse Centre! This month, our blog team has put together a list of our favourite ways to reuse paint swatches.


Michelle

Paint Swatch Collage

Using cut out circles of paint swatches, create a stunning effect of ombre colors. I have also seen triangle cut outs attached side by side.

Don’t forget to frame your art work!


Sarah

I always have a book on the go, (sometimes two or three at a time!) but I don't actually own any bookmarks. I resort to using receipts, scrap pieces of paper, and the torn-off ends of opened mail.

I really love this simple and cute idea for reusing paint swatches and personalizing them with permanent ink or paint. This a great all-ages craft and perfect for back-to-school.

Nichole

There are so many cool and beautiful ways that paint swatches can be repurposed that it makes me want to take a cloth bag to Home Depot and clean them out. For instance, while I've always thought that mosaics are an interesting way to tszuj up a table top, the idea of smashing up ceramics for it seemed messy and slightly dangerous. But this doesn't have to stop me anymore now that I've found this awesome idea for creating a mosaic look with paint swatches! Just secure the paint chips to the wood top and cover with a piece of glass, and you have a gorgeous work of art that you can tailor for any room.


Lana

While the pretty colours of paint swatches make them perfect to incorporate into parts of a scrapbook page or a handmade card, the paper is generally not acid-free or of archival quality.

"Hey Gorgeous", takes advantage of the perfectly matching colours and light weight to create a customized chandelier that's full of movement. Check out the tutorial here. The same technique can be used for a lampshade or a mobile.


Emma

Visit Poppytalk to see how this amazing feature wall was made over the course of a weekend!

Like cleaner lines and a little more order? Design Sponge also has a great example of a paint chip wall

Or if you don't have half of Home Depot's supply of paint chips, a handy dandy calendar, could totally be made from a Reuse Centre picture frame!

Visit DIY Projects for instructions on how to make this cute, custom calendar.


Do you have a great idea that we missed? Add your paint-swatch reuse ideas in the comments below!

Tuesday, 29 July 2014

July Reuse-It Item - Pill Bottles

July's Reuse Item is pill bottles! These little things seem so useful, it's hard to throw them away, and we see loads of them coming through the Reuse Centre. Read on for some practical and unique ways of reusing this common household item!

Lana
Blog team member Emma thought this would be perfect for
Walking Dead or Hunger Games aficionados!

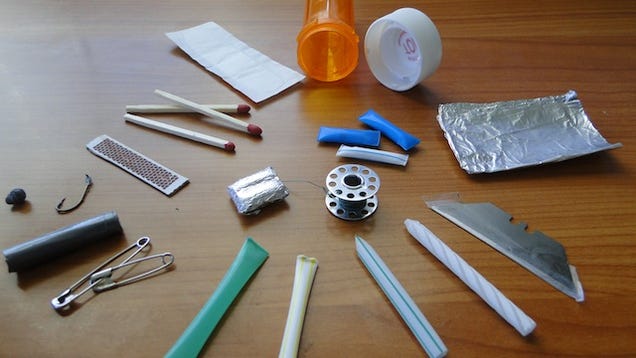
Waterproof and compact, prescription pill bottles are great re-purposed as a travel container. But even if you're not going far away, one would make a perfect little "emergency kit" for day to day. A few spare safety pins, needle, thread (or dental floss), and buttons, and you can fix and prevent a wardrobe malfunction. Include plaster bandages, allergy pills, and a rolled five dollar bill and you'll likely have all bases covered!

Sarah

When pill bottles came up this month, I thought I was going to have a hard time coming up with something other than "put stuff in them", but you really can find anything on the internet!

Can you believe that these gorgeous earrings were made from cut up pill bottles? Check out this article on LilacPOP for more really fantastic examples of jewellery made from pill bottles, including necklaces and more earrings.

The examples on that blog are all made from orange bottles, but the Reuse Centre also sees plenty in blue, fluorescent green, and clear that would look great, too!

Emma

Always forgetting your key? Try keeping a spare somewhere covert with this awesome stealth key hide.
Simply glue a rock to the top of your pill bottle, close up your key inside, and push it down into the dirt. Now you just have to remember which rock it's under!

Visit Thrifty Fun for this and other great ideas.


Nichole


When I see pill bottles, I think of handy ways to keep hair pins and craft supplies organized. When artist Mary Ellen Croteau sees them, however, she sees the potential for installation art.

Her ongoing "Endless Columns" collection, featuring plastic bottle caps, jar lids, pill bottles and other materials that aren't easily recycled, is a social critique and visual challenge for us to look at everyday things in a different way.

Visit her online gallery to see more photos and learn about this innovative art project.


What are your favourite ways to reuse pill bottles? Share your ideas in the comments below!

Tuesday, 10 September 2013

Scraps Project: Slipper Boots

It's almost the end of summer, and sometimes the nights and mornings still carry a bit of a chill. This was one of those mornings; temperatures dipped overnight and since we leave the windows open 24/7 this time of year, the apartment was a bit nippy when I got out of bed. Brisk as it was, I was loathe to close the windows and deprive myself of the fresh air. We're on weather lockdown 8 months of the year; we have to take advantage when we can!

My toes are always the first things to get cold. Enter one of my favourite things about fall and winter in this region: slipper boots. Unfortunately, my own were a few years old and they were looking pretty sad. After a few seasons of good use and many a trip through the washing machine, the soles were cracking and on the right foot, actually breaking off in chunks. The pom-poms had fallen off one slipper, and on the other had long since unravelled and shed their stuffing.

I've been meaning to replace them for a long time now, but once spring hits, slipper boots become difficult to find. I've toyed with the idea of making some, but it just never seemed that urgent. Well, today was the day. With freezing toes and the initiative required to pull out my sewing machine, I sat down to work. 

I had a surprisingly difficult time finding a pattern on the internet. Most free slipper patterns and tutorials seem to be for knitting or crocheting, and of those that were for sewing, hardly any were for boots. Taking a cue from this tutorial I decided to make my own. Of course, since I was making boots instead of snug ballet flat style slippers, things got a little wonky. I simplified. 

First, I traced the bottom of my slipper onto a piece of plain white paper, adding roughly half an inch for seam allowance. Then I grabbed one of my dingy old slippers and a pair of shears. I could see from the seams that the top of the boot was only two pieces, so I cut the top away from the sole and snipped along the joining seams, to end up with this:
The one that's shaped like weird pants? We'll call that pattern piece "Top 1" and the other shall be known as "Top 2".

 I traced these onto paper as well, again adding room for a seam allowance and voila! I had a pattern. Now, I could have started with a nice, fresh bolt of fabric, but where would the fun be in that? Slippers are small and don't take much material, so they are perfect project for using up leftover scraps, or even old clothing. Wooly sweaters make awesome slippers. In my case, I had a failed sewing project, made of the funkiest flannelette in the world. I'd been waiting for some inspiration and a project small enough to use what little I had.
I adore this weird, busy print but it was too much to take in cardigan form.

 My slippers would also need a lining; luckily I was also sitting on some artificial sheepskin that I'd purchased for a coat before changing my mind. I was happy to have a chance to use some of it up. What really urged me to action though, was this recent find at the Reuse Centre:
You really never know what you're going to find in the "Sewing Notions" bin! 
Now, here's a great tutorial if you happen to have two sided fabric, or something thick that doesn't need a liner. If you don't have an old pair of boot shaped slippers, it's also a great reference for pattern design.

Again, using this tutorial (from above) I simply adapted the author's directions for a slightly different shape. I pinned and sewed my boot pieces together using the remaining, uncut slipper as a reference.
Remember me? Top 1 is the heel and ankle piece, and Top 2 is the toe piece. Simply sew (right sides together) the curve of Top 1 to the flat part of Top 2, and then sew the sides of Top 2 together to make the upper half of your boot. 
Even with all of my fiddling and adapting the pattern (not to mention watching TV at the same time), this project only took about an hour and now I have a pair of adorable, cozy new slippers. What do you think?


-Sarah (Volunteer)

Tuesday, 4 June 2013

Vintage Magazines - Don't Judge a Book by it's Cover

One of my favourite spots at the Reuse Centre is the crafty books and magazines. I always leave happy and with arms heaving under the weight of a big stack of magazines brimming with crafty inspiration. 

You see for me I'm obsessed with the 1970's. Crazy swirly paisley fabric,  pompoms, crochet on everything, macrame hanging from the rafters? I love it all, so when I see left and unloved magazines like these, I know they are going to be a fun read. I'm almost reluctant to call them vintage even, as a (very well preserved) child of the 70's I can't help questioning what does that make me?!

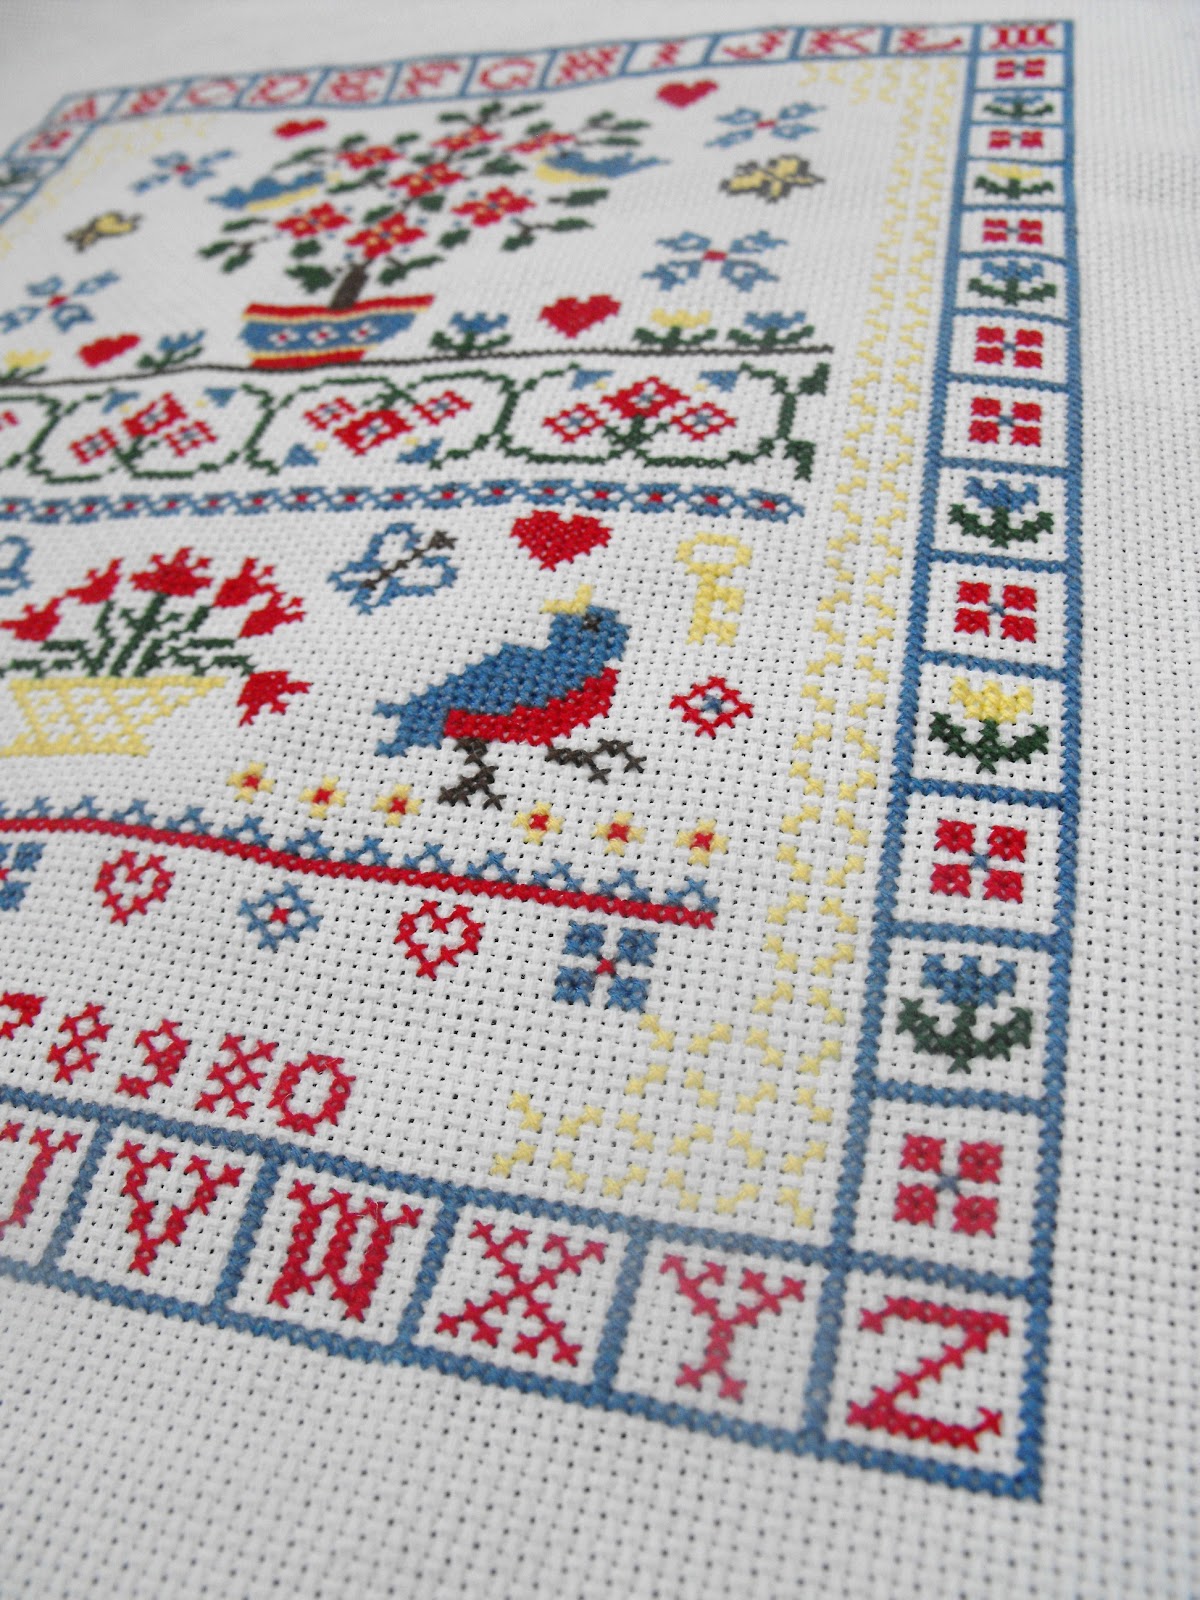
This latest scoop was a Better Homes & Gardens Needlepoint magazine from 1981. Sure the outside looks a little cheesy, and you are definitely going to have a sneaky giggle at the poor men modelling knitted vests, but look closer inside and you may find patterns like this one.

Tree of Life Design

A beautiful cross stitch sampler that I just had to start as soon as I got home. Only 5 different skeins of colours in fresh and vibrant shades produced this design that I can't wait to hang up in my home.

Gorgeous spring flowers

In all its glory

So the covers of these magazines are bound to be dated, but give them a chance, look beyond the psychedelia and try your hand at some of the fun projects inside.

Thinking of crafting for Christmas yet? Get started early, scoop up the Christmas craft books whilst everyone is still buying mosquito lotion and then rustle up some gift worthy crafts like this amazing log cabin dollhouse.


Image taken from magazine below

Have you made something from a vintage pattern, magazine or book you found at the Reuse Centre?
Drop us a line, we would LOVE to hear from you, potential to be featured on this very blog, please get in touch.

-Emma (Volunteer)


Tuesday, 7 May 2013

Tutorial Framed Button Monogram


Mother's Day is fast approaching and it's an occasion for which, I'm sorry to say, I've always had a little trouble in coming up with a good gift.  The day calls for something small, and understated which is a difficult concept for me.  Fortunately, my addiction to Pinterest provided me with a few great (and easy!) ideas for something nice for my mom.  She's been doing some redecorating lately, and trying to find some new and interesting things for the walls, which is why I finally settled on making her a framed Button Monogram.


For this craft, you will need:
A picture frame
Something onto which to mount the buttons: some wallpaper/a square of fabric
A lot of buttons
Glue (hot, crazy, craft) OR Needle and thread
A pencil

My mom has pretty classy taste, and she's really into black and white graphics.  I decided to design her monogram with black/dark buttons on a white background, then mount it in a black frame.  I found a nice, unused 8" x 10" shadow box lying around the house, but you can also find the perfect frame at the Reuse Centre!  

I removed the insert with the cheesy photo from the frame and used it as a template to cut out the anaglypta wallpaper I found to use.  I like the textured quality of the anaglypta, but an interesting piece of fabric would be equally lovely.

I didn't want to waste buttons or wreck the monogram by free-styling their placement, so I first laid out a few loose buttons in an "S" shape to help choose the right sizes and colours.  You could also trace the letter you want with a pencil, but the pattern on the anaglypta made this a bit difficult.  This way, you can make any necessary changes before you make anything permanent with glue.  (In this case, I switched out the big buttons for smaller ones and used some coloured ones instead of all black.)


If you're using fabric, you'll probably want to secure the buttons with needle and thread.  After attaching the first layer of buttons, you can plump up the monogram by filling in any empty spaces with more buttons.  Allow the monogram plenty of time to dry, then just pop it in the frame!  I finished it off with some pearly pins in the corners for some added interest.  


This was unbelievably easy (and needless to say, economical) to assemble, and now my mom will have something new for her walls.

Happy Mother's Day!

-Nichole (Volunteer)